Getting Started
Get started with ServersCTL in minutes. Install the free Linux agent using the one-shot command from the control panel and begin monitoring, managing, and protecting your servers from a single unified platform.
- Introduction
- Requirements
- Register & Install the Agent
- Part I - HAProxy Server Pools
- Overview & concepts
- Create your first pool & Enroll your first member
- Pool workspace (Overview, Settings, DNS, DR, Monitoring)
- Pool members & enrollment
- DNS failover & traffic cutover
- HAProxy operations
- Backups & disaster recovery
- Recipes & scheduled jobs
- Agent reference
- Troubleshooting & FAQ
- Part II - Linux Server Pools
- Member Tab Bar
- Overview Tab
- Security Tab
- OpenLiteSpeed Tab
- MariaDB/MySQL Tab
- cPanel Tab
- Status Tab
- Cron & Jobs Tab
- Restore Backups Tab
- Recipes Tab
- Monitoring Tab
- Settings Tab
- Part III - Storage Pools
- Introduction
- Plans, costs, and quota
- Create your first Storage Pool
- Navigation overview
- Getting data into a Storage Pool
- Send To, Deploy, and Restore
- Activity, S3, Settings & Deleting Objects
- Troubleshooting & Glossary
- Troubleshooting
- Partner WHMCS Program
- Uninstall The Agent
Introduction
A message from the developers.
ServersCTL started life as a solution to a problem many of us face: HAProxy is often the single point of failure in an otherwise resilient infrastructure.
The original goal was simple. Build a way to monitor HAProxy instances and automatically move traffic if a load balancer becomes unavailable without VRRP or a floating/failover IP address. Once the first working version was in place, it became clear that the underlying concept was far more powerful than we had anticipated.
By combining a lightweight agent with infrastructure-focused automation, we found ourselves solving many of the day-to-day challenges that infrastructure managers encounter. Monitoring, backups, disaster recovery, DNS failover, cPanel replication, service management, object deployments, DIFF, Versioning and operational visibility could all be brought together into a single platform.
ServersCTL and BalCTL are not intended to replace the tools you already use. Instead, they aim to sit alongside them, providing practical automation and visibility where it matters most.
Today, we are releasing the Linux agent free of charge for anyone to use. Our hope is that it saves you time, reduces operational headaches, helps keep your services online, and perhaps one day saves your bacon when you need a backup or a failover plan.
We release this with no limits on the number of pools you can create or the number of servers you can manage. A Pro subscription gives you access to all features for HAProxy and Generic Linux Servers running RHEL, AlmaLinux, Rocky Linux, Ubuntu, and Debian. This includes integrations for cPanel, MariaDB, and OpenLiteSpeed.
If you find this product useful, support us by upgrading your account, contributing ideas or even reporting a bug. Everything helps.
We hope you find it useful.
What the agent is
The ServerCTL/BalCTL agent is a small Python 3.9+ process (stdlib only, no pip packages) that runs on each pool member Linux VM. It:
- Heartbeats to the control plane over outbound HTTPS (proves liveness, reports host/HAProxy state).
- Pulls jobs from the control plane after each successful heartbeat (install, reload, backup, restore, firewall, etc.).
- Optionally self-updates from a published zip bundle.
It is deployed as a systemd service: balctl-heartbeat.service, with secrets in /etc/balctl/agent.env.
Current release: check AGENT_VERSION in agents/balctl_heartbeat.py or python3 balctl_heartbeat.py --version.
Requirements
Server Stack
Operating system
- Supported: Debian/Ubuntu and RHEL family (AlmaLinux, Rocky, CentOS).
- Init: systemd (required — agent is designed as a systemd unit).
- Architecture: Linux x86_64 (typical VPS; agent uses standard distro package managers).
Runtime dependencies
Optional packages (installed by agent jobs when needed)
Network requirements
Outbound HTTPS (required)
The VM must reach:
All agent API traffic must use HTTPS — the agent refuses plaintext BALCTL_API_BASE / BALCTL_UPDATE_URL (v28+).
Inbound (not required)
Panel-driven operations use the outbound job queue. No inbound SSH or agent port is required if the agent runs as root for privileged jobs.
IP allowlisting (enrollment)
When you create a pool member, you must supply at least one allowed source IPv4. This is the VM’s outbound/egress IP as seen when it calls the control plane — not necessarily its SSH IP or the IP traffic should hit.
The control plane validates CF-Connecting-IP against the enrolled allowlist on every agent request. Mismatch → 403.
Enrollment requirements
Before the agent can heartbeat, create the member in the dashboard (Add pool member):
Authentication model
Register & Install the Agent
Installation
When adding a pool, you will be asked whether the pool will be for HAProxy nodes.
Only select the HAProxy Pool Template if the backend server(s) are currently running, or will be running, HAProxy.
For all other server types—including cPanel, OpenLiteSpeed, MySql/MariaDB, and general-purpose Linux hosts—select Generic Linux.
Choosing the correct template ensures that the UI enables the appropriate features and management tools for that server type. If you accidentally select the wrong template, remove any members from the pool and recreate the pool on the correct template.
Recommended: one-shot from the dashboard
You can access the UI using https://serversctl.com/app or https://balctl.com/app. Only the public websites are different.
- Register an account at https://serversctl.com/app/
- Add a new pool. https://serversctl.com/app/sites
- Servers can be pooled together. For example, cPanel Servers, LiteSpeed, MariaDB/MySQL all use the Generic Linux template, or HAProxy servers use the dedicated HAProxy template.
- Select Add Member. The modal generates a paste-ready command that:
- Ensures
unzip+python3(via apt or dnf/yum). - Downloads
https://download.serversctl.com/agent.zip. - Runs
balctl-agent.sh --enrol --key … --hostname … --api-base …. - Writes
/etc/balctl/agent.env, runs--update, enables systemd.
- Ensures
- The ServersCTL UI will now start to report agent information.
- See troubleshooting if you have problems.
To add further members to a pool. Keep using the Add Member button.
Files after install
Bundle contents (agent.zip)
Flat zip: balctl_heartbeat.py, balctl-agent.sh, balctl-heartbeat.env.example, balctl-heartbeat.service, README.md, LICENSE, INSTALL_VM.txt.
Configuration (/etc/balctl/agent.env)
If your configured hostname is different from the hostname sent to ServersCTL, use BALCTL_HOSTNAME
Systemd loads this via EnvironmentFile=/etc/balctl/agent.env. Manual sudo python3 … runs merge missing vars from the same file.
Part I - HAProxy Server Pools
Overview & concepts
What is an HAProxy pool?
An HAProxy pool is a ServerCTL deployment preset for the edge tier: public DNS, one or more enrolled Linux VMs running HAProxy, and optional automatic promotion when the active host fails.
ServerCTL is the control plane. It does not terminate customer traffic itself. It:
- Enrols VMs via the ServersCTL agent
- Publishes a managed A record through Cloudflare or cPanel/WHM
- Tracks heartbeats (~1s check-ins) and systemd HAProxy health
- Queues remote jobs (install, reload, backup, drain) that run on the next heartbeat
Status: HAProxy pools are well tested and in public beta.
Core terminology
Architecture (high level)
Health for failover: A member is unhealthy when:
- No heartbeat within the failover delay window (10–120 seconds), or
- HAProxy is monitored, and systemd reports HAProxy inactive
Important: Clients must use the failover hostname, not a member’s raw IP. ServerCTL moves the A record; your apps keep the same DNS name.
What HAProxy pools include vs other presets
HAProxy pools uniquely enable:
- Remote HAProxy jobs (install, reload, backup)
- HAProxy systemd probe on member cards
- Disaster Recovery tab (cross-member restore, 2+ members)
- Traffic-flow diagram on Overview
- HAProxy Status tab
Generic Linux pools hide HAProxy-specific jobs unless the agent detects HAProxy on the host.
Create your first pool & Enroll your first member
Create your first pool
Step 1 — Add pool
- Go to Pools → Add pool
- Choose the HAProxy template
- Name the pool (e.g.
production-edge) - After create, you land in the pool with a setup banner
Step 2 — Connect DNS (Settings)
ServerCTL needs API access to authoritative DNS to create/update the failover A record.
Cloudflare
- API token: Zone · DNS · Edit (+ zone read)
- Cloudflare Account ID
- Select the zone that will host your public hostname
cPanel / WHM
- WHM hostname and port (usually 2087 or 443)
- WHM username + API token
- Zone domain (apex), e.g.
example.com
You can save reusable Cloudflare credentials under Settings → API providers and link them to pools without re-entering tokens.
Step 3 — Enrol the first member
On Overview → Add member:
After creating, copy the one-shot install command immediately and run it in the HAProxy Server — the enrollment secret is shown once.
The command:
- Downloads the agent bundle
- Runs
balctl-agent.sh --enrol --key … --hostname … - Writes
/etc/balctl/agent.env - Installs and starts
balctl-heartbeat.service
Within a few seconds, the member tab should show a green heartbeat.
Step 4 — Set the public failover hostname
Settings or Managed DNS tab:
- Set DNS label (e.g.
lb→lb.example.com) - Choose orange-cloud (proxied) vs DNS-only as needed
- On Overview, Make active on the member that should receive traffic
Step 6 — Add a standby (High Availability)
Repeat enrollment on a second VM. Enable Automatic failover in Settings when ready for unattended promotion.
Pool workspace (Overview, Settings, DNS, DR, Monitoring)
Pool workspace
The pool page has a tab bar with three groups:
- Overview (pool home)
- Member tabs (one per enrolled host)
- Pool tools (DR, Monitoring, Settings, Managed DNS)
Overview tab
For HAProxy pools, Overview answers:
- Is traffic on the active node?
- Are standbys ready?
- Will DNS move if HAProxy or the agent fails?
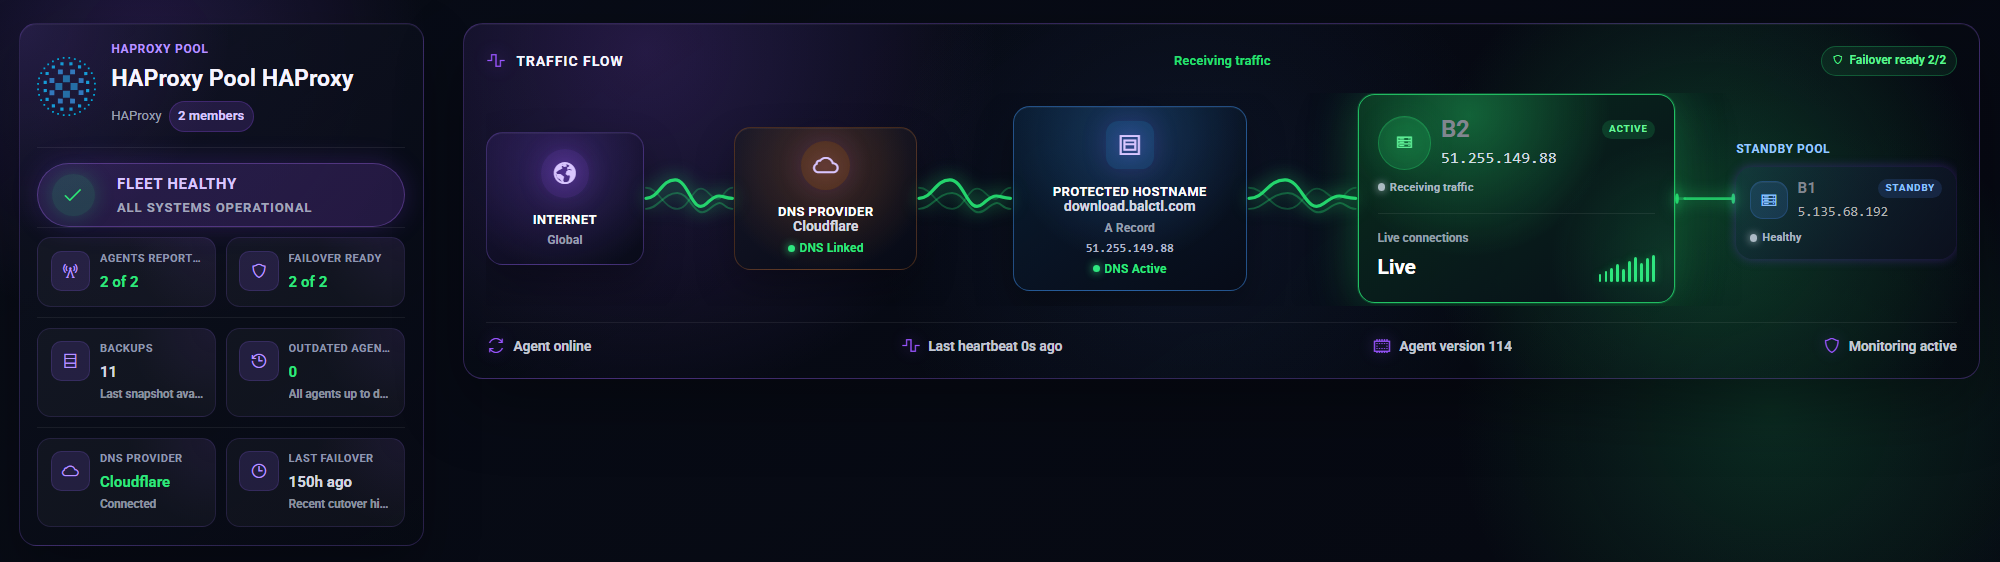
Hero panel: Traffic-flow diagram — Cloudflare/DNS → active HAProxy → standbys.
Actions:
- Add member
- Cut DNS to standby — manual DNS cutover to next ready standby (requires connected DNS)
- Settings shortcut
KPI tiles: healthy members, failover-ready count, backups, cron jobs, last failover time.
Member cards show Active vs Standby, heartbeat state, and Make active on standbys.
Settings tab
Failover hostname, proxied vs DNS-only, and Dynamic DNS sync live on the Managed DNS tab (not only Settings).
Managed DNS tab
- Failover DNS label and FQDN preview
- Orange cloud vs DNS-only
- Dynamic DNS sync — optional; updates A record when active member’s public IPv4 changes on heartbeat
- DNS connectivity test
- Current A record target IP
Disaster Recovery tab
Visible when the pool has 2+ members (HAProxy preset only).
Cross-member restore: Pick a target member, choose a snapshot from another host’s backups, restore scoped HAProxy files onto the target.
Requires Pro or active trial for cross-member restore.
Monitoring tab
Pool-wide alert settings and failover notification preferences (email when auto-failover promotes a standby).
Per-member monitoring is under each member’s Monitoring tab.
Protection tab
Only appears when 2+ cPanel members exist — not core HAProxy-only pools. Document separately if you mix cPanel hosts into an HAProxy pool.
Pool members & enrollment
Member tab layout
Click a member in the tab bar to open its workspace. Sub-tabs:
HAProxy-specific Management actions (install, reload, drain, TLS failover) are surfaced on Control panel and via Recipes — the dedicated HAProxy tab exists in code but is hidden until product-ready.
Enrollment security model
Each heartbeat must satisfy:
- Bearer token — 48-character enrollment secret (hashed in D1)
CF-Connecting-IP— must match allowed source IP(s)- JSON
hostname— must match enrolled hostname
Mismatch → 403 (IP) or credential errors.
Agent environment
Agent runs as root for HAProxy install, backup/restore, admin socket, and cert writes.
DNS failover & traffic cutover
Manual cutover
Make active on a standby member → ServerCTL sets it as primary and updates the managed A record to its public IPv4.
Cut DNS to standby on Overview → promotes next failover-ready standby (same DNS update, overview-oriented workflow).
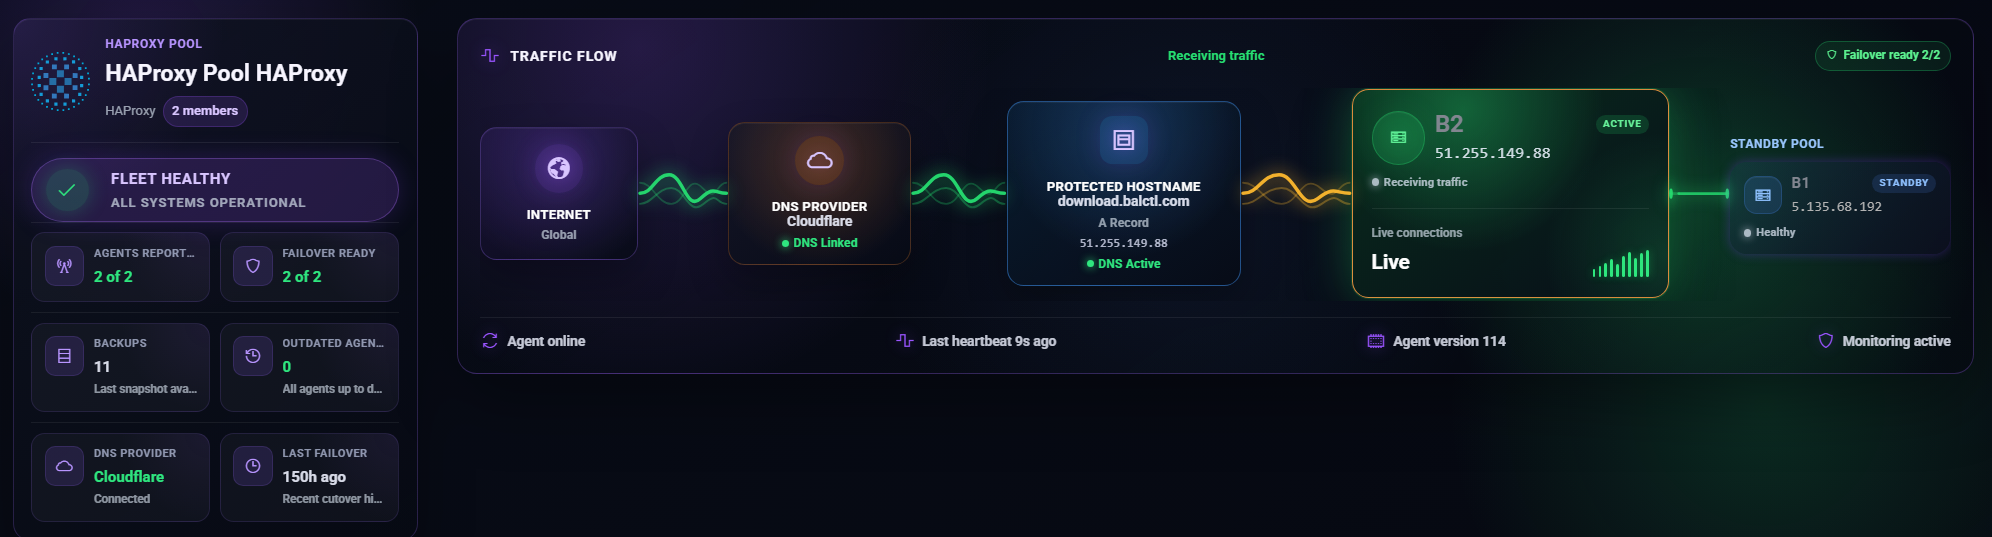
Automatic failover
Enable in Settings → Balancer failover.
When enabled, ServerCTL periodically evaluates the active member. Promotion triggers when:
- Heartbeat age exceeds failover delay, or
- HAProxy is monitored and inactive
A healthy standby is promoted; DNS is updated; optional email alert fires.
Failover delay
Agents' heartbeat independently (~1s); failover delay is not the heartbeat interval.
Failover-ready criteria
A standby is ready when:
- Recent heartbeat within the failover window, and
- HAProxy is not down (when monitored)
Dynamic DNS Sync
Optional for HAProxy pools when the active member’s WAN IPv4 changes (DHCP/ISP churn). Each heartbeat can push the new public IP to Cloudflare without manual DNS edits.
Proxied vs DNS-only
- Orange cloud (proxied): Traffic through Cloudflare; good for HTTP/S when origin IP hiding matters.
- DNS-only (grey cloud): Clients connect directly to member IPv4 — required for raw TCP services (e.g. non-HTTP on custom ports).
HAProxy operations
Install & lifecycle
Jobs are enqueued to the API; the agent claims and runs them on the next heartbeat.
Admin stats socket (drain / ready)
Runtime backend control requires a Unix admin socket in haproxy.cfg:
stats socket /run/haproxy/admin.sock mode 600 level admin expose-fd listeners
stats timeout 2m
Enable via Recipe: Enable HAProxy admin stats socket or Enable admin stats socket action.
Requires socot + agent as root. This is not a public HTTP stats page.
Backend server states
From Management/topology table:
TLS (Let’s Encrypt on HAProxy)
Recipe: Let’s Encrypt (failover / HAProxy)
- Uses DNS-01 via Cloudflare for the pool failover FQDN
- Agent writes combined PEM:
/etc/haproxy/certs/<hostname>.pem - One-time operator step: add
ssl crt /etc/haproxy/certs/<hostname>.pemin config, validate, reload - Renew from Management or cron preset
tls.acme_renew_force
The pool must have Cloudflare linked and a failover label set before the recipe applies.
Status tab
Shows live traffic from agent heartbeat enrichment — not a duplicate of the Overview topology diagram. Use for session rates, backend health columns, etc.
Backups & disaster recovery
What gets backed up
HAProxy backup job captures:
/etc/haproxy/haproxy.cfgandconf.d/*.cfg/etc/haproxy/certs/*- Let’s Encrypt material under
/etc/letsencrypt/ - Paths referenced by
ssl crtin config under/etc/ - Optional UFW rules (
backup.ufw) — separate job
Storage: Per member S3.
Path pattern:
Restore flows
Same member: Restore Backups tab → pick snapshot → scoped restore → agent validates with haproxy -c → reload.
Cross-member (DR tab): Restore another member’s snapshot to a target VM — typically after an outage or a bad config push.
Fresh VM rebuild:
- Enrol new/replacement member
- Optional: Install HAProxy
- Restore snapshot
- Make active when ready
Standby provisioning
Provision standby from backup clones, HAProxy config from a backup onto a standby host — faster than manual copy for DR drills.
Recipes & scheduled jobs
Recipes (member → Recipes tab)
Recipes show steps, completion state, and optional disable actions (e.g. remove admin socket lines).
Cron & Jobs tab
Control-plane cron (UTC) enqueues jobs on the next agent heartbeat.
Common presets:
- HAProxy backup
haproxy.reload- TLS force renew
failover.evaluate(pool-level failover check)
Separate from per-member backup schedule on Restore Backups — both can exist.
Job timeline
All agent jobs appear in Cron & Jobs with status: pending → running → completed/failed. Remote actions from Overview cards also enqueue here.
Agent reference
Heartbeat payload (HAProxy-relevant)
The agent sends JSON including:
ip— declared/probed IPv4hostnamehaproxyblock — monitored, active, topology, listeners, optionalshow statsummary
ServerCTL validates IP against enrollment and stores the latest row per node.
CLI essentials
sudo balctl_heartbeat.py --version
sudo balctl_heartbeat.py --provision-haproxy # local install
sudo balctl_heartbeat.py --update # from configured agent.zip URL
sudo journalctl -u balctl-heartbeat.service -f
Job loop
POST /api/agents/heartbeat- Server returns pending jobs
- Agent executes, posts
POST /api/agents/jobs/complete
Full agent docs: agents/README.md in the repo.
Troubleshooting & FAQ
Support bundle: If contacting support, include the pool name, member hostname, journalctl excerpt, screenshot of member health badge.
Appendix — Plan gating (for operators)
Part II - Linux Server Pools
Member Tab Bar
| Tab | Always in nav? | Active when |
|---|---|---|
|
Control panel
|
Yes
|
Always
|
|
Security
|
Yes
|
Always
|
|
OpenLiteSpeed
|
Yes (Generic)
|
Content when OpenLiteSpeed detected; else frosted not detected overlay
|
|
MariaDB
|
Yes (Generic)
|
Content when MariaDB/MySQL detected or cPanel-managed MySQL
|
|
cPanel
|
Yes (Generic)
|
Content when cPanel detected else frosted overlay
|
|
Status
|
Yes
|
Always — host/agent health summary
|
|
Cron & Jobs
|
Yes
|
Always
|
|
Restore Backups
|
Yes
|
Always
|
|
Recipes
|
Yes
|
Always
|
|
Monitoring
|
Yes
|
Always
|
|
Settings
|
Yes
|
Always
|
Overview Tab
Member Overview
Purpose: Host-level operations on this Server — OS family, uptime, services, quick actions, TLS.
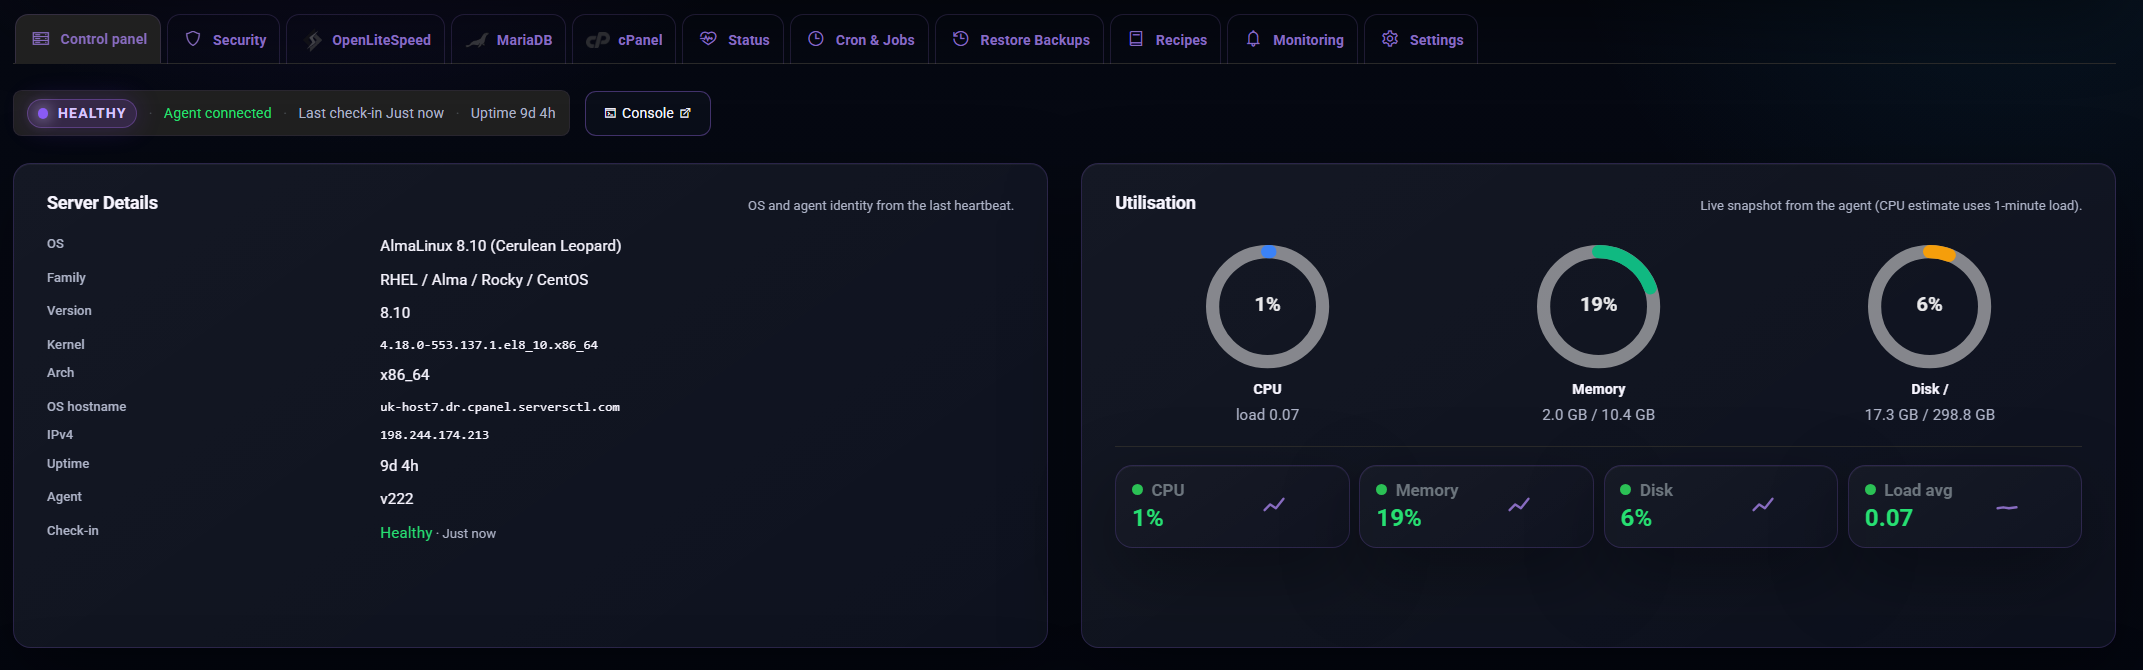
What you see
Security Tab
Member Security
Tab: Security.
Use the Security tab to check and manage host-level firewall and SSH access for one server in a hosting pool. It is for server access control, not website, database, or cPanel account security.
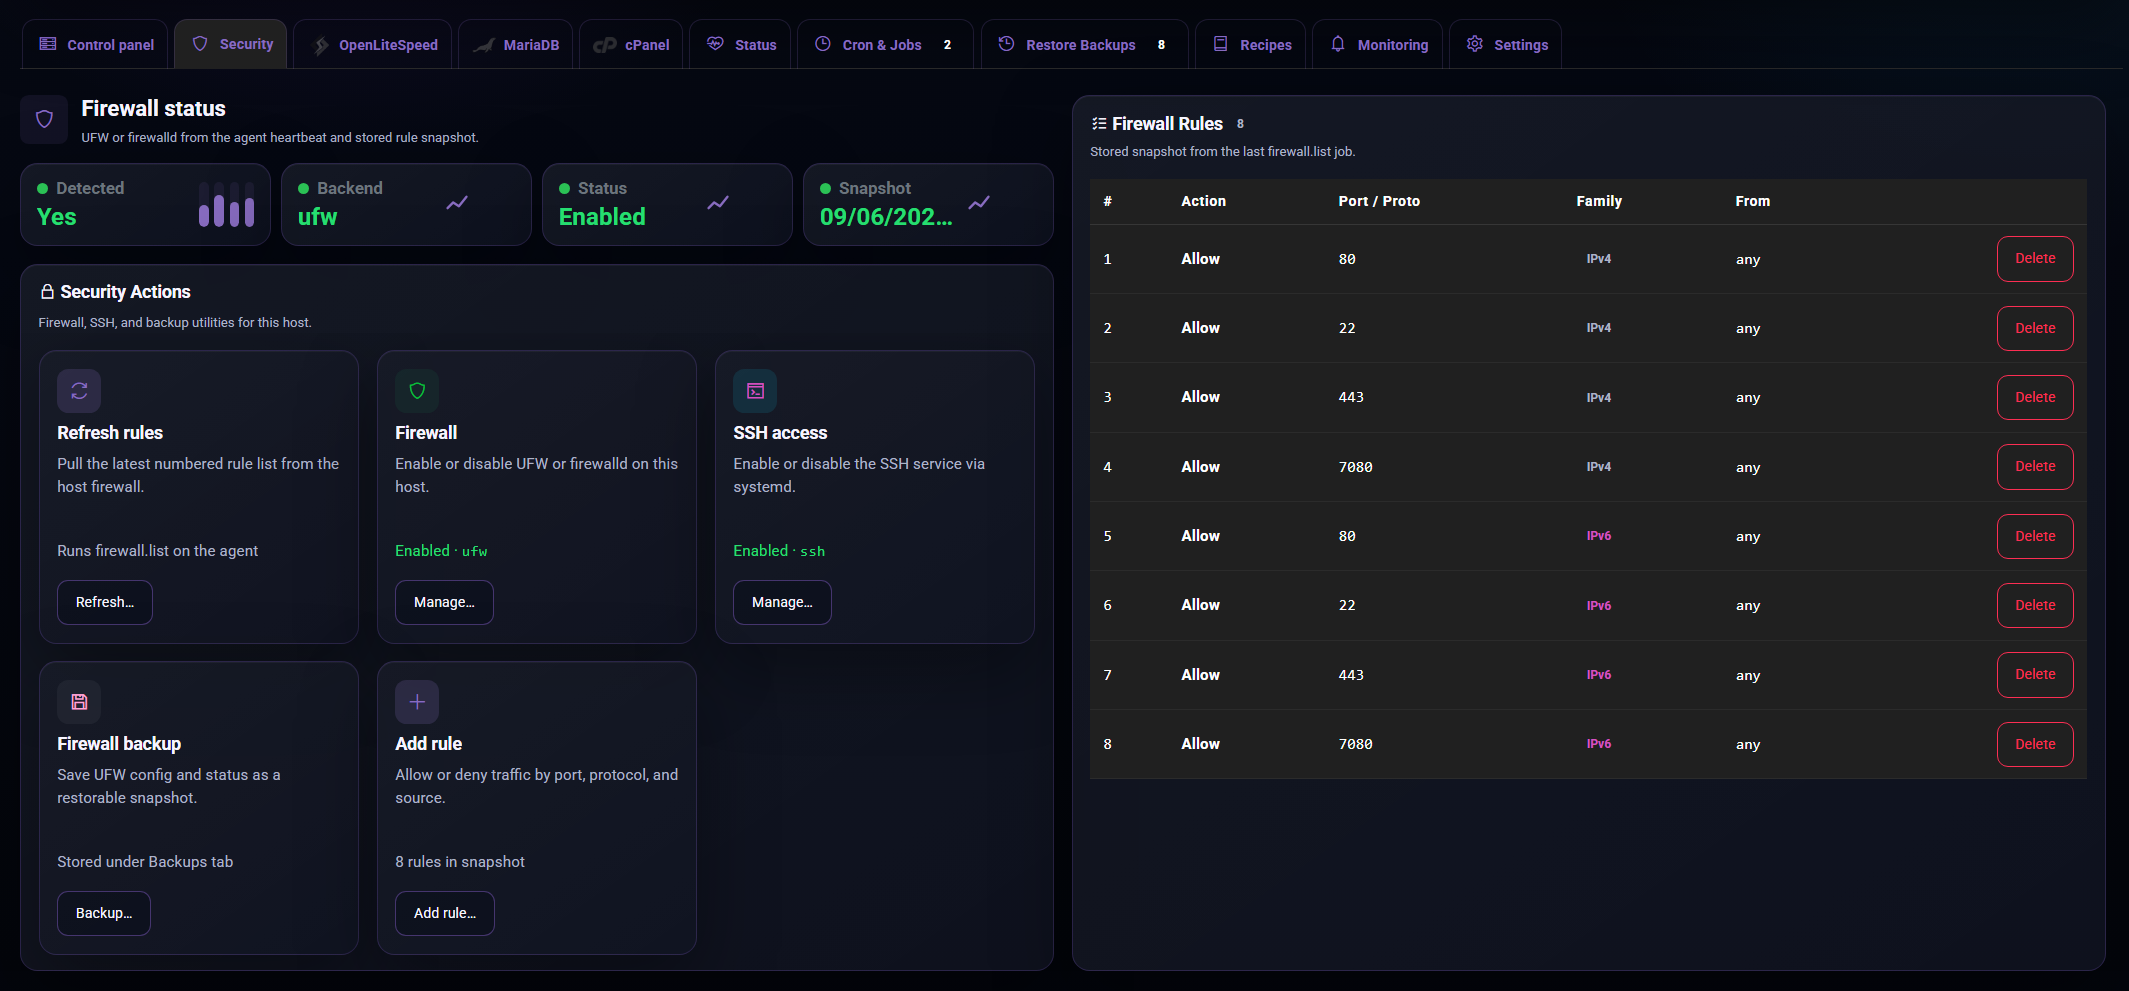
What you can do
Supported firewall views are based on what the member reports, commonly UFW or firewalld.
Free and Pro
Community gives visibility. Pro gives controlled action: rule changes, firewall state changes, SSH access control, and firewall backups before risky changes.
Firewall status
Open Pool, choose the member, then select Security.
The firewall status area shows:
If the firewall is not detected, the member may not have a supported firewall installed or the agent may not have enough information yet. Refresh rules after fixing the host.
Refreshing rules
Use Refresh rules to pull a fresh firewall rule list from the host.
Refresh is useful after:
The rules table updates after the job completes. Check Cron & Jobs if the refresh does not appear to finish.
Managing the firewall
Use Firewall to enable or disable the detected firewall backend.
Before enabling the firewall:
Before disabling the firewall:
Existing rules are preserved. Refresh rules after the job completes so the table reflects the new state.
Adding rules
Use Add rule to allow, deny, or reject traffic by protocol, port, and source.
The form asks for:
Use narrow sources where possible. For example, allow SSH from your office or VPN range instead of allowing it from anywhere.
Deleting rules
Use Delete from the firewall rules table when a rule is no longer needed.
Deleting a rule can immediately change live traffic. Check the action, port, protocol, source, and comment before confirming.
SSH access
Use SSH access to enable or disable the SSH service on the host.
Disabling SSH may close current sessions and block new SSH logins. The balctl agent should continue running, so you can turn SSH back on from the Security tab when the member is still checking in.
Use this carefully. If the agent stops checking in and SSH is disabled, you may need console access from your server provider.
Firewall backup
Use Firewall backup before large firewall changes, migrations, or security cleanups.
Firewall backups are stored with the member's backups so they can be found from the backup and restore areas. Keep a backup before removing broad rules or changing access to production services.
What this tab does not manage
The Security tab is host-level only.
OpenLiteSpeed Tab
Member OpenLiteSpeed
Tab: OpenLiteSpeed.
Sub Tabs: Overview, Recovery Wizard
Use the OpenLiteSpeed tab to manage standalone OpenLiteSpeed servers in a hosting pool. It gives you one place to check the web server, create recovery points, restore sites, and move sites to another compatible OpenLiteSpeed server.
This tab is for servers running OpenLiteSpeed directly. cPanel servers use the cPanel tools instead.
What is included
| Area | What you use it for |
|---|---|
| Overview | Check server health, open the WebAdmin panel, reload or restart OpenLiteSpeed, test configuration, update PHP packages, and create a server config backup. |
| Backups | Create site, web-file, database, and full recovery points for OpenLiteSpeed applications. |
| Transfer Wizard | Move an OpenLiteSpeed site to another compatible OpenLiteSpeed member. |
Community and Pro
| Feature | Community | Pro |
|---|---|---|
| View detected OpenLiteSpeed status | Included | Included |
| Open WebAdmin link and view basic server details | Included | Included |
| Refresh detected applications | Included | Included |
| View linked databases when discovered | Included | Included |
| Create OpenLiteSpeed backups | Upgrade required | Included |
| Restore OpenLiteSpeed backups | Upgrade required | Included |
| Transfer sites between OpenLiteSpeed servers | Upgrade required | Included |
| Automatic DNS cutover after restore or transfer | Upgrade required | Included |
Pro turns this tab from a read-only view into a recovery and migration workspace. It is designed for operators who need to move sites quickly, keep usable recovery points, and reduce manual rebuild work.
Overview
Open Pool, choose the OpenLiteSpeed member, then select OpenLiteSpeed.
The Overview area shows:
- WebAdmin access for the selected member.
- Current service state and key server details.
- Actions for reload, restart, configuration test, backup, upgrade, and PHP package updates.
- Recent log output when available.
Use Config test before restarting a busy server. If the test fails, fix the configuration first so the web server does not reload into a broken state.
Backups
Open Backups to work with detected OpenLiteSpeed applications.
Each application card shows the site name, document root, PHP and TLS information when available, linked databases when discovered, and the latest recovery point.
To create a recovery point:
- Select the application.
- Choose Backup now.
- Pick the backup type.
- Confirm the storage estimate and start the backup.
Common backup types:
| Backup type | Use it when |
|---|---|
| Full site backup | You want the safest recovery point for a real application. |
| Files only | You only changed web files, themes, plugins, uploads, or static content. |
| Databases only | You only need a database snapshot for a linked schema. |
Recovery points can be restored, downloaded, inspected, or deleted from the same workspace.
OpenLiteSpeed Transfer Wizard
Use the OLS Transfer Wizard when you want to move an OpenLiteSpeed site to another compatible OpenLiteSpeed member.
Transfer a Site (OpenLiteSpeed to OpenLiteSpeed)
To transfer a site:
- Open Transfer Wizard.
- Select the source application.
- Choose a compatible destination member.
- Confirm whether DNS will be updated manually or automatically.
- Start the transfer and watch the progress panel.
Destination servers must be compatible. cPanel servers are not valid OpenLiteSpeed transfer targets, even if they also run LiteSpeed or expose similar services.
DNS cutover
After a restore or transfer, DNS still decides where visitors go.
| Option | Availability | What happens |
|---|---|---|
| Manual DNS update | Community and Pro | The site is moved or restored, then you update the A record yourself. |
| Automatic DNS update | Pro | The platform updates the saved DNS provider record after the operation completes. |
Automatic DNS is useful when you want a cleaner migration flow and already have a DNS key saved for the domain or account.
Good operating habits
- Run a full backup before major changes.
- Use configuration test before restarting OpenLiteSpeed.
- Keep enough storage for at least one known-good recovery point per important site.
- Confirm DNS after any restore or transfer.
- Use Pro for production migration and recovery workflows where speed matters.
Direct Transfer security model
Direct Transfer is not an open file receiver and it is not general-purpose SSH access. The API acts as the control plane for a single copy operation:
- The authenticated operator starts a transfer. The dashboard calls the Worker with the selected source member, destination member, cPanel username, route mode, and DNS handling choice. The Worker checks plan access, pool ownership, WHM/cPanel compatibility, account state, agent versions, destination disk, and route availability before creating the run.
- API creates a one-use session. The Worker mints a random session ID, records the exact source node, destination node, account username/domain, expected byte count, destination address, source IP filter, status, and expiry. Session APIs reject unknown, expired, terminal, wrong-role, or wrong-status sessions.
- Only enrolled agents can advance it. Source and destination agents call back using their normal enrolled heartbeat credentials. The Worker verifies that the calling node is the recorded source or destination for that session before accepting prepare, public-key registration, progress, transfer-complete, or restore-complete updates.
- The source generates an ephemeral SSH key. The source agent creates a session-scoped keypair for this transfer. The private key stays on the source server. The public key is sent to the Worker, which queues an authorised job for the destination agent.
- Destination installs a restricted receiver key. The destination agent writes the public key to root
authorized_keyswith a forced command for chunk receive only, plusfrom=<source-ip>,no-port-forwarding,no-X11-forwarding,no-agent-forwarding,no-pty, andno-user-rc. A matchingsession.jsonmust exist before any chunk is accepted. - Chunks are individually checked. The source agent streams fixed-size chunks over SSH. The forced receiver accepts only
sessionId, chunk index, and chunk SHA-256, reads the chunk from stdin, verifies the chunk hash, and writes it under that session's temporary receive directory. - Archive integrity is checked before restore. After transfer, the destination agent assembles the archive and verifies the final SHA-256 recorded on the session/run before calling
restorepkg. - Session cleanup is automatic. On success, failure, expiry, or revoke, the destination removes the matching
authorized_keysline and deletes the temporary session directory. The Worker will also queuecpanel_account_sync_revokeif the run fails before normal cleanup.
The session lifetime is time-limited. It has a 30-minute minimum and scales with package size using a conservative transfer-rate estimate, so a large package has enough time to complete without leaving a permanent receiver open.
MariaDB/MySQL Tab
Standalone database server
Overview
Use the MariaDB / MySQL tab to check database service health, refresh the live database inventory, create database backups, and restore database versions when needed.
This tab appears for Generic Linux members. It is useful for dedicated database servers, OpenLiteSpeed servers with local databases, and cPanel servers where MySQL is managed by WHM.
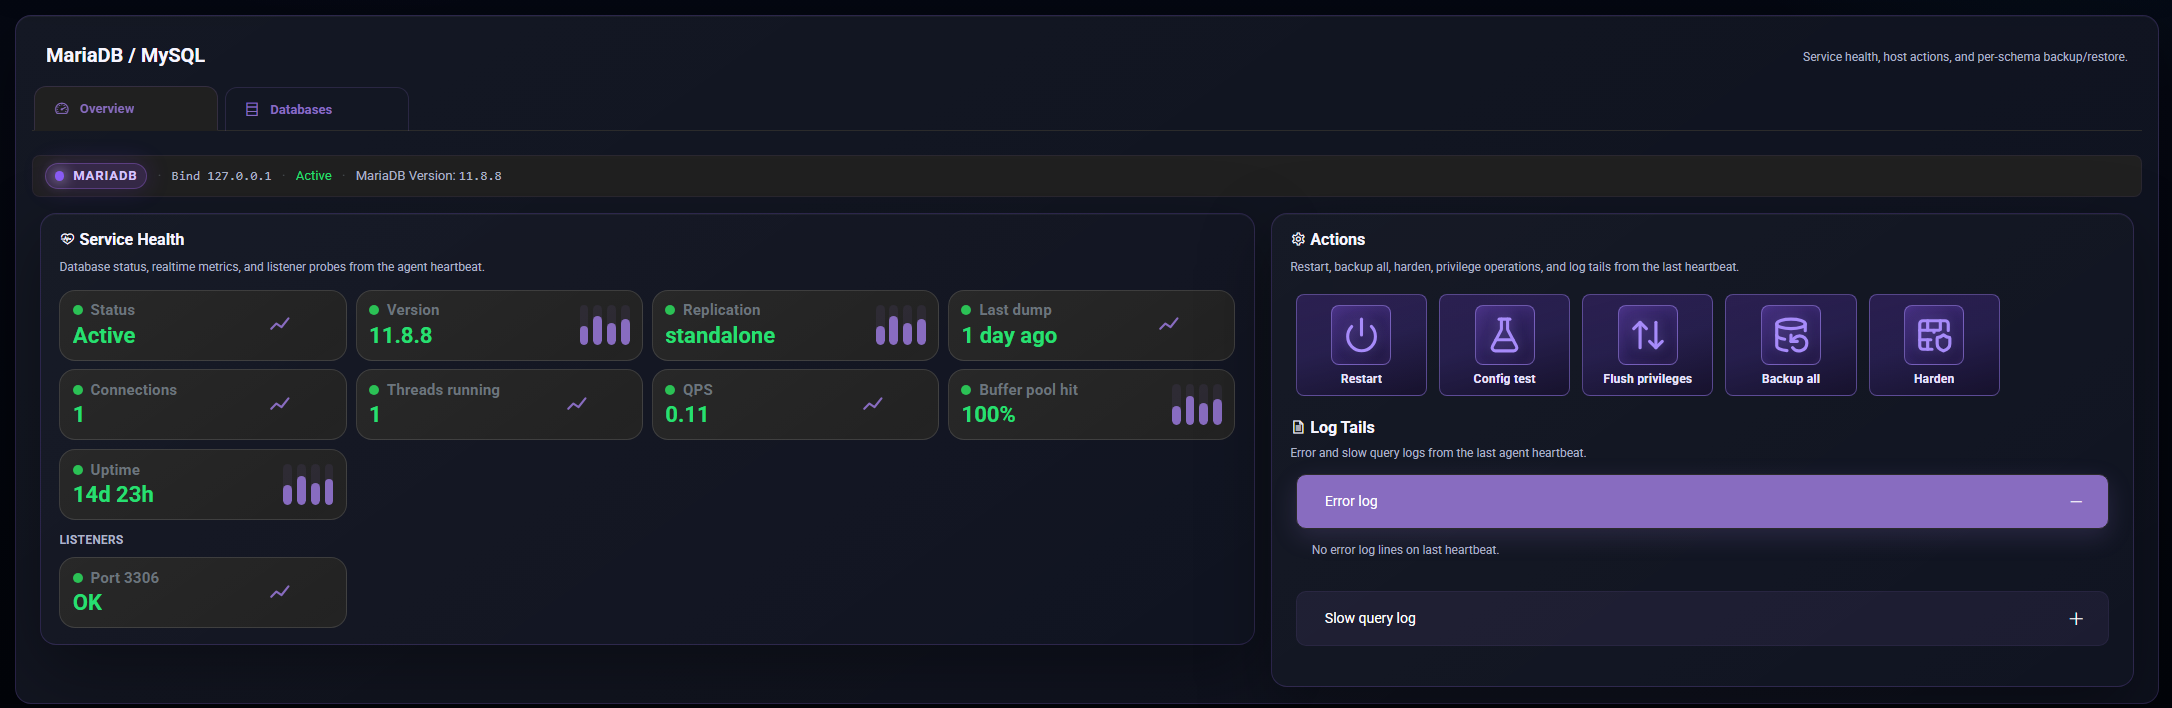
What is included
| Subtab | What you use it for |
|---|---|
| Overview | Check database service health, listener status, version, replication role, recent backup age, logs, and service actions. |
| Databases | View live schemas, refresh discovery, see backup versions, back up selected schemas, restore versions, and delete old database backups. |
Free and Pro
| Feature | Community | Pro |
|---|---|---|
| View service health and heartbeat-reported database status | Included | Included |
| View version, listener, uptime, and basic metrics when available | Included | Included |
| View live database inventory | Included | Included |
| Refresh live database discovery | Included | Included |
| View existing backup versions | Included when available | Included |
| Back up all databases | Upgrade required | Included |
| Back up selected schemas | Upgrade required | Included |
| Restore database backup versions | Upgrade required | Included |
| Delete managed database backup versions | Upgrade required | Included |
| Choose a Storage Pool for database backups | Upgrade required | Included |
Pro is for real database operations: scheduled recovery coverage, one-click backups before risky changes, schema-level restore, and storage-aware backup management.
Overview subtab
Open Pool, choose the member, select MariaDB / MySQL, then open Overview.
The Overview subtab shows:
- Database service status.
- Server version.
- Replication or Galera role when reported.
- Last all-databases backup age.
- Listener status, usually port 3306.
- Connections, running threads, queries per second, uptime, and buffer pool signals when available.
- Error and slow-query log tails from the latest member report.
Available actions include:
| Action | Use it when |
|---|---|
| Restart | The database service needs a controlled restart. |
| Config test | You want to check database configuration before restarting. |
| Flush privileges | Database grants or users were changed and privileges need reloading. |
| Backup all | You want one recovery point containing all databases on the member. |
| Harden | You want the platform to apply supported database hardening guidance or actions. |
On cPanel servers, the tab may show a cPanel host notice. Use the cPanel tab for WHM account work, but use Databases here to refresh and back up discovered application schemas.
Databases subtab
Open Databases to work with the live schema inventory.
The Databases subtab shows:
- Live schemas currently found on the server.
- Size and table count when available.
- Database engine details where reported.
- Backup version count for schemas with stored recovery points.
- The latest backup age for each backed-up schema.
- A discovery cache age so you know how fresh the list is.
Use Refresh live when you have added databases, restored accounts, moved sites, or changed application database settings. On cPanel and web hosts, discovery can also find application-linked schemas from known config files.
Backing up databases
To back up all databases:
- Open Overview.
- Choose Backup all.
- Pick the Storage Pool if more than one is available.
- Review the estimate and start the backup.
To back up selected schemas:
- Open Databases.
- Open the menu on the schema card.
- Choose Backup.
- Confirm the schemas and Storage Pool.
- Start the backup.
The backup modal warns when the selected Storage Pool does not have enough remaining space.
Restoring versions
To restore a database version on Pro:
- Open Databases.
- Open the menu on a schema with backup versions.
- Choose Versions.
- Select the version you want.
- Choose Restore and confirm.
Restoring a database can overwrite live data. Check the version date, source member, and schema name before confirming.
Deleting versions
Use Delete from the versions modal when you no longer need a stored database backup. Deletion is permanent, so keep at least one known-good recovery point for important schemas.
cPanel-managed MySQL
On cPanel servers, MySQL is shared across accounts. That means:
- WHM account tasks stay in the cPanel tab.
- Database inventory and schema backups stay in MariaDB / MySQL.
- Use Refresh live after adding or restoring cPanel accounts.
- Application-linked schemas may appear after discovery even when root-level metrics are limited.
Galera (wsrep) (In Alpha)
When Galera is enabled, the agent will report the wsrep state. ServersCTL does not run quorum, SST, or writer election. DNS is active ≠ Galera primary.
cPanel Tab
Use the cPanel member tab to manage a WHM server in a ServersCTL hosting pool. It brings server health, WHM accounts, account transfers, recovery actions, and cPanel service controls into one workspace for the selected server.
The cPanel tab is for WHM/cPanel servers. OpenLiteSpeed-only servers use the OpenLiteSpeed tab instead.
Free and Pro
| Feature | Community | Pro |
|---|---|---|
| View cPanel overview and service state | Included | Included |
| View Operations health, metrics, logs, and WHM API status | Included | Included |
| View all WHM accounts and account details | Included | Included |
| Manual Agent Transfer between cPanel servers | Included | Included |
| Create, suspend, unsuspend, modify, or terminate accounts | Upgrade required | Included |
| One-time cPanel login links | Upgrade required | Included |
| cPanel account backups and AutoSSL actions | Upgrade required | Included |
| cPanel service restarts, config checks, hardening, and config backup | Upgrade required | Included |
| Automatic DNS update during Agent Transfer | Upgrade required | Included |
| Migrate & Recovery live WHM transfers | Upgrade required | Included |
| Pool Protection and scheduled replication | Upgrade required | Included |
Community is enough for visibility and manual account copy workflows. Pro is for production hosting operations: account management, automated DNS cutover, recovery, live transfers, backups, and service control.
Requirements
For the full cPanel workspace:
- The server must be enrolled as a pool member.
- The balctl agent must be checking in.
- cPanel/WHM must be detected.
- WHM must be linked for account and migration tools.
- A second compatible cPanel member is needed for transfer workflows.
- Saved DNS keys are needed for automatic DNS updates.
If the tab is visible but actions are unavailable, check the member Status tab, WHM link state, and plan level.
Subtabs
| Subtab | What you use it for |
|---|---|
| Overview | See cPanel protection state, service badges, quick actions, WHM links, and account recovery topology. |
| Operations | Check cPanel service health, disk, network, WHM API status, metrics, logs, and server-level actions. |
| Accounts | List WHM accounts, inspect account details, create accounts, suspend, unsuspend, back up, log in, run AutoSSL, and terminate accounts. |
| Agent Transfer | Copy one account directly to another compatible cPanel server using the installed agents. |
| Migrate & Recovery | Start and monitor WHM live transfer sessions between cPanel members. |
Some subtabs only appear after the server is detected as cPanel and WHM is linked for the pool.
Overview subtab
Use Overview as the first stop for a cPanel member.
The Overview subtab shows:
- The cPanel protection and recovery topology.
- Whether accounts are protected or have standby coverage.
- Service stack badges.
- Quick links to WHM and Webmail when available.
- Quick actions such as account creation or backup where available.
- WHM audit information when the server is linked.
Use this subtab to understand whether the selected server is acting as the live source, standby, or an unprotected cPanel host.
Operations subtab
Use Operations for server-level cPanel health and maintenance.
The Operations subtab shows:
- cPanel health and license state.
- Web, mail, cPanel, database, and related service state.
- Listener and network information.
- Disk usage and server metrics.
- WHM API status and DNS drift information.
- cPanel and mail log tails.
Common Pro actions:
| Action | Use it when |
|---|---|
| Restart web | Apache/httpd is down or web traffic needs a controlled restart. |
| Restart mail | Exim or Dovecot needs a controlled restart. |
| Restart cPanel | WHM/cPanel services are unhealthy. |
| Config check | You want to check cPanel configuration health before changes. |
| Backup config | You want a cPanel metadata/config recovery point. |
| Harden ports | You want supported cPanel firewall/service hardening. |
| Refresh snapshot | You want the latest WHM service snapshot and DNS drift state. |
Check Cron & Jobs after starting any action.
Accounts subtab
Use Accounts to work with WHM accounts on the selected server.
The Accounts subtab shows:
- All WHM accounts returned for the member.
- Domain, username, IP, plan, email, disk usage, and status where available.
- Filters for all, active, and suspended accounts.
- Account details in a drawer or modal.
- Protection and DNS hints when configured.
Community users can view the full list and inspect details. Pro users can also run account actions.
Pro account actions:
| Action | What it does |
|---|---|
| Create account | Creates a WHM account with username, domain, password, plan, and contact email. |
| Suspend / Unsuspend | Changes whether an account can be used. |
| Login | Opens a one-time cPanel login session. |
| Backup | Creates a cPanel account backup. |
| Change package | Moves the account to another WHM package. |
| Reset password | Generates and shows a new password once. |
| Run AutoSSL check | Starts an AutoSSL check for accounts. |
| Terminate | Permanently removes the account after confirmation. |
Termination is destructive. The confirmation asks you to type the domain so accidental deletion is harder.
Agent Transfer subtab
Agent Transfer is the member cPanel inner tab for one-shot cPanel → cPanel account copies between enrolled pool members. Agents package the source account, move the archive over a direct route or through user storage, restore on the destination with restorepkg, and optionally swing the DNS after the copy succeeds.
Direct Transfer security model
Direct Transfer is not an open file receiver and it is not general-purpose SSH access. The API acts as the control plane for a single copy operation:
- The authenticated operator starts a transfer. The dashboard calls the Worker with the selected source member, destination member, cPanel username, route mode, and DNS handling choice. The Worker checks plan access, pool ownership, WHM/cPanel compatibility, account state, agent versions, destination disk, and route availability before creating the run.
- API creates a one-use session. The Worker mints a random session ID, records the exact source node, destination node, account username/domain, expected byte count, destination address, source IP filter, status, and expiry. Session APIs reject unknown, expired, terminal, wrong-role, or wrong-status sessions.
- Only enrolled agents can advance it. Source and destination agents call back using their normal enrolled heartbeat credentials. The Worker verifies that the calling node is the recorded source or destination for that session before accepting prepare, public-key registration, progress, transfer-complete, or restore-complete updates.
- The source generates an ephemeral SSH key. The source agent creates a session-scoped keypair for this transfer. The private key stays on the source server. The public key is sent to the Worker, which queues an authorised job for the destination agent.
- Destination installs a restricted receiver key. The destination agent writes the public key to root
authorized_keyswith a forced command for chunk receive only, plusfrom=<source-ip>,no-port-forwarding,no-X11-forwarding,no-agent-forwarding,no-pty, andno-user-rc. A matchingsession.jsonmust exist before any chunk is accepted. - Chunks are individually checked. The source agent streams fixed-size chunks over SSH. The forced receiver accepts only
sessionId, chunk index, and chunk SHA-256, reads the chunk from stdin, verifies the chunk hash, and writes it under that session's temporary receive directory. - Archive integrity is checked before restore. After transfer, the destination agent assembles the archive and verifies the final SHA-256 recorded on the session/run before calling
restorepkg. - Session cleanup is automatic. On success, failure, expiry, or revoke, the destination removes the matching
authorized_keysline and deletes the temporary session directory. The Worker will also queuecpanel_account_sync_revokeif the run fails before normal cleanup.
The session lifetime is time-limited. It has a 30-minute minimum and scales with package size using a conservative transfer-rate estimate, so a large package has enough time to complete without leaving a permanent receiver open.
This is the direct account transfer workspace. It is separate from scheduled Protection and separate from the WHM live transfer wizard.
To transfer an account:
- Open Agent Transfer on the source cPanel member.
- Choose or drag an active account.
- Choose a compatible destination cPanel member.
- Review the route preflight.
- Choose DNS handling.
- Start the transfer.
- Watch the transfer spotlight until it completes.
DNS handling:
| Option | Availability | What happens |
|---|---|---|
| Manual DNS update | Community and Pro | The account is copied. You update DNS yourself when ready. |
| Update A record automatically | Pro | ServersCTL uses a saved Cloudflare or cPanel DNS key after restore succeeds. |
The direct route is preferred. If direct transfer cannot work and user storage is available, the transfer can use storage as the fallback route. If storage is required but unavailable, add storage or use another transfer method.
After a successful direct transfer, the temporary transfer access is cleaned up. The account archive may remain on the destination server for the user to remove when they are finished with it.
Migrate & Recovery subtab
Use Migrate & Recovery for live WHM transfer sessions between cPanel members.
This is a Pro workflow for native WHM transfers. It shows outgoing and incoming sessions for the selected server, including route, direction, status, DNS cutover state, and last update time.
To start a live WHM transfer:
- Open Migrate & Recovery.
- Choose Start transfer.
- Pick the account.
- Pick the target cPanel server.
- Review preflight checks.
- Decide whether DNS cutover should run.
- Confirm and monitor the session.
Use the refresh button to update transfer sessions. If a completed transfer had DNS cutover enabled but DNS failed, use the retry option after fixing the DNS key or zone issue.
Agent Transfer vs Migrate & Recovery vs Protection
| Tool | Best for |
|---|---|
| Agent Transfer | One-off account copy using ServersCTL agents. Community can use manual DNS; Pro can automate DNS. |
| Migrate & Recovery | Pro live WHM transfer sessions between cPanel members. |
| Pool Protection | Pro scheduled standby replication and failover readiness across protected accounts. |
Use Agent Transfer when you want a direct copy now. Use Protection when you want ongoing standby coverage. Use Migrate & Recovery when you specifically want the WHM transfer workflow.
WHM Binding
Full WHM API when member matches pool host. Run WHM link check recipe after DNS connect.
Status Tab
Use the Status tab to see whether a server is online, reporting correctly, and ready for work. It is the first place to check when a member looks stale, jobs are not moving, or a server has not checked in recently.
What you can see
The Status tab shows a live operational summary for the selected member:
| Area | What it tells you |
|---|---|
| Heartbeat | Whether the member is checking in and how recent the last signal was. |
| Agent version | The installed agent version and whether an update is available. |
| Host details | Hostname, operating system, uptime, and basic identity details. |
| Resources | CPU, memory, disk, and other capacity signals when reported by the member. |
| Security basics | Firewall and SSH status when available. |
| Updates | Whether the server appears to need package updates. |
Some specialist members may show a tailored status view for their role, such as HAProxy.
Free and Pro
| Feature | Community | Pro |
|---|---|---|
| View heartbeat and online state | Included | Included |
| View agent version and host details | Included | Included |
| View reported resource usage | Included | Included |
| View firewall, SSH, and update signals when reported | Included | Included |
| Use advanced tabs that act on status signals | Limited | Included |
| Faster operational recovery using backup, transfer, and automation tools | Upgrade required | Included |
The Status tab is included because every user needs to know whether their member is healthy. Pro adds the tools around that signal: backup, restore, transfer, scheduling, and automation.
How to use it
- Open the pool.
- Select the member.
- Open Status.
- Check the heartbeat first.
- Review resource, update, firewall, and agent signals.
If the server is online but a feature is not behaving as expected, check Cron & Jobs next. That tab shows whether recent actions are queued, running, completed, or failed.
Common checks
| What you see | What it usually means |
|---|---|
| Recent heartbeat | The agent is checking in and the member can be managed. |
| Stale heartbeat | The server, network, or agent may need attention. |
| Agent update available | Update the agent before testing new features. |
| High disk usage | Backups, restores, and transfers may fail unless space is freed. |
| Firewall warning | Remote access or service traffic may be blocked. |
Cron & Jobs Tab
Member Cron & Jobs
Use Cron & Jobs to see scheduled work and recent server tasks for a member. It helps you confirm whether backups, discovery runs, refreshes, and other actions are queued, running, completed, or failed.
What it is for
| Area | What you use it for |
|---|---|
| Schedules | View and manage recurring jobs for the selected member. |
| Recent jobs | Check the latest actions sent to the member. |
| Run now | Trigger a supported scheduled task immediately when available. |
| History | See whether work completed or needs attention. |
Times are shown in the product interface for easy reading. When you are coordinating with logs or support, include the member name and the job time shown in the UI.
Free and Pro
| Feature | Community | Pro |
|---|---|---|
| View recent jobs and outcomes | Included | Included |
| See existing schedules | Included | Included |
| Create recurring schedules | Upgrade required | Included |
| Edit, pause, resume, or delete schedules | Upgrade required | Included |
| Run scheduled jobs on demand | Upgrade required | Included |
| Use backup and discovery automation | Upgrade required | Included |
Pro is where Cron & Jobs becomes automation instead of just visibility. It is intended for teams that want regular backups, routine discovery refreshes, and repeatable maintenance without manual checklists.
Using recent jobs
Open Cron & Jobs and look at the recent job list.
Each job usually shows:
- What action was requested.
- The current state.
- When it started or finished.
- The member that handled it.
- Any visible failure reason.
If a job fails, use the failure message to decide the next step. Common causes are stale agent heartbeat, missing storage, low disk space, incompatible service type, or a feature that requires Pro.
Using schedules
Schedules are useful for repeated operational work.
To create a schedule on Pro:
- Open Cron & Jobs.
- Choose Add schedule.
- Pick the job type.
- Set the timing.
- Confirm the target and save.
Use schedules for routine backups and refresh tasks. Avoid scheduling risky changes unless the result is easy to verify and recover from.
Good operating habits
- Check recent jobs after starting a backup, restore, transfer, or discovery run.
- Keep schedules simple and clearly named.
- Pause schedules during major migrations if they could interfere.
- Use Pro schedules for regular backup and discovery coverage.
Restore Backups Tab
Use Restore Backups to find recovery points for a member and put them back when something needs to be recovered. It is the recovery workspace for server backups, service backups, application backups, and other stored recovery points that belong to the member.
What you can do
| Area | What it is for |
|---|---|
| Recovery timeline | Browse available backups by date and type. |
| Backup details | Inspect size, source, version, and what the recovery point contains. |
| Restore | Put a compatible backup back onto a server. |
| Download | Download a recovery point when available. |
| Delete | Remove old backups you no longer want to keep. |
| Run backup | Create a fresh backup when the member and plan support it. |
Free and Pro
| Feature | Community | Pro |
|---|---|---|
| View available recovery points | Included when storage is connected | Included |
| Inspect backup details | Included | Included |
| Download supported backups | Included when allowed by storage policy | Included |
| Create new cloud backups | Upgrade or storage required | Included with connected storage |
| Restore backups from the UI | Upgrade required | Included |
| Delete managed recovery points | Upgrade required | Included |
| Cross-member restore to compatible servers | Upgrade required | Included |
Pro gives you the recovery controls that matter during an incident: create fresh backups, restore faster, and recover to compatible members without turning the process into manual file handling.
Finding a backup
- Open the pool.
- Select the member.
- Open Restore Backups.
- Use the timeline or filters to find the backup type you need.
- Open the backup details before restoring.
Check the source member, backup type, date, and size before you restore. For full server or site backups, confirm the destination is compatible.
Restoring a backup
To restore on Pro:
- Select the recovery point.
- Choose Restore.
- Review the compatibility and warning messages.
- Confirm the target.
- Start the restore.
- Watch the job progress in Cron & Jobs if needed.
Restores are intentionally gated because they can overwrite live files, service configuration, databases, or accounts. If a restore target is incompatible, choose another server or use the correct product tab for that service.
Creating a fresh backup
Use Run backup when you want a new recovery point before maintenance, upgrades, migrations, or risky changes.
Compatibility rules
Backups should be restored to compatible servers.
| Backup type | Restore expectation |
|---|---|
| OpenLiteSpeed site backups | Restore to compatible OpenLiteSpeed members. |
| cPanel account backups | Restore to compatible cPanel members. |
| Database backups | Restore where the database engine and target are suitable. |
| Service configuration backups | Restore only where the operating system and service match. |
Do not use a backup to push Ubuntu service files onto a RHEL server, or cPanel account backups onto a non-cPanel host.
Tips
- Create a fresh backup before major work.
- Check Status before restoring.
- Check Cron & Jobs after starting the restore.
- Keep storage connected and healthy so recovery points can be created automatically.
- Use Pro for production recovery, cross-member restores, and faster rollback.
Recipes Tab
Use the Recipes tab to run guided setup, hardening, verification, TLS, and maintenance actions on one server. Recipes are designed for repeatable server tasks where the platform can do the routine work and then show whether the result is active, inactive, running, or needs review.
Recipes apply to the selected member only. Pool-wide features such as Protection, Managed DNS, and Storage Pools are managed from their own pool tabs.
What recipes are
Recipes are guided actions for common server tasks:
The Recipes tab shows only recipes that make sense for the selected server. A cPanel server will show cPanel recipes. A database server will show database recipes. An OpenLiteSpeed server will show OpenLiteSpeed recipes.
Free and Pro
Community is useful for visibility. Pro turns Recipes into a guided operations toolkit for production hosts.
Recipe card states
If a card says the agent must be updated first, run Update balctl agent, wait for the member to check in again, then return to the recipe.
Running a recipe
Some recipes can be disabled again from the card menu. Disable actions can affect access or service behavior, so read the confirmation before continuing.
Common recipes
Install recipes for cPanel, OpenLiteSpeed, and MariaDB/MySQL may be launched from the relevant product area instead of appearing as general recipe cards. After installation is detected, the matching member tab becomes available or active.
TLS recipes
TLS recipes need a compatible DNS setup because certificate validation may require DNS changes.
Before running TLS recipes:
Use the Control panel or service-specific tab after the certificate is issued if the web server still needs configuration.
Hardening recipes
Hardening recipes usually adjust or verify firewall/service access for the selected stack.
Before running a hardening recipe:
Hardening helps with standard access rules, but it does not replace a full security review.
WHM and cPanel recipes
cPanel recipes appear when cPanel is detected.
Use them to:
Account management still belongs in the cPanel tab. Scheduled standby replication still belongs in the pool Protection tab.
Monitoring Tab
Use the member Monitoring tab to choose alert thresholds for one server. This is different from pool Monitoring, which handles fleet-level and protection/failover alerts.
Member Monitoring answers: when should this specific server email me because heartbeat, CPU, memory, disk, cPanel service, or cPanel account quota needs attention?
What you configure
| Area | What it is for |
|---|---|
| Heartbeat | Email when the agent stops checking in. |
| CPU | Email on sustained high CPU usage. |
| Memory | Email on sustained memory pressure. |
| Disk space | Email when the root filesystem reaches a selected usage level. |
| cPanel service alerts | Email when selected core cPanel services are down. |
| Hosting account disk quota | Email when WHM accounts on the member reach a disk threshold. |
| Recovery notifications | Email when the member recovers after an alert state. |
Alert recipients are managed in member Settings. Monitoring controls what triggers an alert; Settings controls who receives it.
Free and Pro
| Feature | Community | Pro |
|---|---|---|
| View live monitoring state | Included | Included |
| Heartbeat alert at community timing | Included | Included |
| Faster heartbeat alert presets | Upgrade required | Included |
| CPU, memory, and disk threshold alerts | Upgrade required | Included |
| cPanel service-down alerts | Upgrade required | Included |
| cPanel hosting account quota alerts | Upgrade required | Included |
| Recovery notification emails | Upgrade required | Included |
Community gives basic heartbeat awareness. Pro gives proper server operations alerts, with faster timing and resource/service thresholds.
Alerts
Infrastructure alerts
The first section covers the server itself.
| Alert | Useful when |
|---|---|
| Heartbeat | You want to know the agent stopped checking in. |
| CPU | You want alerts for sustained compute pressure. |
| Memory | You want alerts before memory pressure affects services. |
| Disk space | You want warnings before the root filesystem fills. |
CPU and memory alerts need telemetry from the agent and are based on sustained usage, not one short spike.
cPanel alerts
When cPanel is detected, Monitoring also shows cPanel-specific alert presets.
Use cPanel service alerts for services such as web, mail, database, and other core WHM services reported by the member. Use hosting account disk quota alerts to watch WHM account disk usage across accounts on that server.
These alerts are Pro features because they are production hosting controls, not just basic host reachability.
Saving monitoring settings
- Open the pool.
- Select the member.
- Open Monitoring.
- Choose the alert presets you want.
- Click Save monitoring settings.
If a preset is disabled, it usually requires Pro or an active trial, or the matching service has not been detected on that member.
Settings Tab
Use member Settings to manage identity, allowed source IPs, alert recipients, agent update behavior, WHM access, and member removal for one enrolled server.
This tab is for the selected member only. Pool name, pool deletion, Managed DNS, Storage Pools, and Protection settings live in their own pool-level areas.
What you can manage
| Section | What it is for |
|---|---|
| Member details | Friendly name, agent hostname, and allowed source IPs. |
| Alert recipients | Account email toggle and additional team email addresses for monitoring alerts. |
| Agent updates | Installed agent version, update channel, and auto-update setting. |
| WHM API key | cPanel account discovery and recovery access for this member. |
| Danger zone | Remove the member from the pool. |
Free and Pro
| Feature | Community | Pro |
|---|---|---|
| View member details | Included | Included |
| View alert recipient settings | Included | Included |
| Send alerts to account email where available | Included | Included |
| Edit member name, hostname, and allowed IPs | Upgrade required | Included |
| Add extra team alert recipients | Upgrade required | Included |
| Change agent update channel and auto-update | Upgrade required | Included |
| Add, edit, rotate, or remove WHM API key | Upgrade required | Included |
| Remove member from pool | Upgrade required | Included |
Community keeps settings visible. Pro gives the operational controls needed for teams and production hosting.
Member details
Member details control how the server is identified and allowed to connect.
| Field | Meaning |
|---|---|
| Friendly name | Display name shown in the pool UI. |
| Agent hostname | Hostname the member should report as. |
| Allowed source IPs | Public egress IP addresses allowed to contact ServersCTL for this member. |
Be careful when editing allowed IPs. If the member's real egress IP is removed, the agent may stop checking in until the allowed list is corrected.
Alert recipients
Settings controls who receives monitoring emails.
You can:
- Send alerts to the account email.
- Add extra team email addresses on Pro.
- Remove extra recipients.
- Save recipient changes.
The alert rules themselves are configured in the member Monitoring tab.
Agent updates
The Agent updates card shows the installed agent build and lets Pro users choose:
| Setting | Meaning |
|---|---|
| Production | Normal release channel for most users. |
| Stable | Conservative channel when available. |
| Development | Early channel for testing newer builds. |
| Auto-update | Lets the member update itself according to the selected channel. |
Use Production for normal production servers unless support asks you to use another channel.
WHM API key
When cPanel is detected, Settings shows a WHM API key card.
The member WHM key is used for cPanel account discovery and local WHM operations for that server, such as account management and recovery checks. It is not the same as a DNS provider key.
Available Pro actions:
| Action | What it does |
|---|---|
| Add WHM API key | Links this cPanel member to WHM access. |
| Rotate key | Replaces the saved key. |
| Edit | Updates WHM connection details. |
| Remove | Removes the saved WHM access for this member. |
DNS cutover keys belong in Managed DNS, not in member Settings.
Remove member
The Danger zone lets Pro users remove the member from the pool.
Removing a member detaches it from the pool so it can be enrolled again with a fresh key. Do this only when you are sure the server should no longer be managed from this pool.
Before removing a member:
- Check whether it is used by Protection, Agent Transfer, or recovery workflows.
- Confirm you no longer need its backups or history from the pool view.
- Make sure you know how to reinstall or re-enroll the agent if needed.
Part III - Storage Pools
Store files, back up to S3, check diffs, and schedule deployments across all members.
Introduction
Storage Pools
Storage Pools are the central distribution platform for ServersCTL. Publish backups, configuration files and deployment packages from browsers, agents or external software, then compare, version, schedule and deploy them safely across your infrastructure.
Storage Pools hold things you care about in production:
-
OpenLiteSpeed site and vhost backups.
-
cPanel account backups.
-
MariaDB / MySQL dumps.
-
HAProxy, nginx, PHP, SSL, cron, firewall, and other configuration files.
-
Browser uploads and deployment packages.
Each pool is a named, regional destination with its own quota, S3 credentials, and object browser. Storage is account-scoped: one login can have multiple pools (for example London Recovery and Toronto DR). Pools are not tied to a single server pool—you can send or restore from a Storage Pool to any enrolled member in your account when compatibility rules allow.
The product thinks in objects (for example example.com vhost, all-databases dump, nginx site config), not raw folder paths. Repeated backups of the same site become new versions under the same object.
Where to find Storage Pools
|
Location |
What you get |
|---|---|
|
Left sidebar → Storage Pools |
Account overview and list of all pools |
|
|
Storage Pools overview (usage, recent objects, live activity) |
|
|
Create a new pool (region + capacity + name) |
|
|
Objects — browse, upload, discover, deploy, restore |
|
|
Live incoming/outgoing jobs |
|
|
S3 endpoint and keys for WHM/cPanel/scripts |
|
|
Slug, region, quota breakdown |
The sidebar footer also shows aggregate storage used / quota across all pools.
Plans, costs, and quota
Storage capacity is billed at the account level. Each Storage Pool has its own assigned quota slice of that account capacity.
Included with Pro
|
Plan |
Base storage |
|---|---|
|
Community |
0 bytes — you must purchase add-on capacity before backups can upload |
|
Pro (active subscription) |
5 GiB included |
|
14-day trial |
Same as Pro while trial is active |
When you create a Storage Pool, you can apply the Included 5 GiB (Pro) capacity option once per account (until that entitlement is fully claimed). The create wizard shows how much included storage is still available.
Storage Pool add-ons (monthly)
If you need more space, purchase a Storage add-on. Prices are per month; checkout uses the region of the pool or vault you are protecting.
|
Capacity |
Monthly price |
|---|---|
|
10 GiB |
$4 |
|
50 GiB |
$12 |
|
100 GiB |
$20 |
|
250 GiB |
$40 |
|
500 GiB |
$65 |
How add-ons combine with Pro: add-on bytes add to your account quota. A Pro account with a 10 GiB add-on has 15 GiB total (5 GiB included + 10 GiB add-on), not 10 GiB replacing the included amount.
Where to buy add-ons: the Storage Pool tier picker appears when:
-
A backup or upload is blocked for insufficient quota
-
You use the replication wizard Cloud Backup Storage step
-
Legacy pool Storage flows that still surface the tier cards
Purchases go through Stripe Checkout (Account billing). Upgrading an existing storage subscription changes the current Stripe item with proration instead of creating a duplicate subscription.
What counts toward quota
-
Final stored objects and backup archives
-
Temporary upload staging while a large backup is still assembling (hidden from the object browser but counted until complete)
-
Active upload reservations while an agent backup is in progress
When the quota is full, new uploads fail with a clear insufficient storage message until you delete objects or buy more capacity.
Feature access by plan
|
Action |
Community |
Pro / active trial |
|---|---|---|
|
Browse & download objects |
Yes |
Yes |
|
Run backups into storage |
Only with purchased quota |
Yes (with quota) |
|
Browser upload |
Locked |
Yes (max 5 GiB per file) |
|
Delete objects |
Locked |
Yes |
|
Restore to server |
Locked |
Yes (compatible targets) |
|
Deploy config to server |
Locked |
Yes |
|
Configuration Discovery |
Locked |
Yes |
|
Deployment Wizard |
Locked |
Yes |
Regions and endpoints
When you create a Storage Pool, you choose a region (physical vault cluster). Pick the region closest to your servers and restore targets for lower latency.
Billing regions (Stripe)
Add-on checkout is priced per vault region:
|
Region key |
Label shown in billing |
|---|---|
|
|
EU West |
|
|
CA East |
|
|
SG Central |
Additional regions may appear in the create wizard, marked Coming soon.
Your pool’s hostname
Each pool gets a dedicated endpoint on serversctl.com storage infrastructure:
{pool-slug}.{region}.storage.serversctl.comExample: slug london-recovery in EU West → london-recovery.eu-west.storage.serversctl.com
Use this hostname for:
-
WHM / cPanel → Additional Destinations → S3 Compatible
-
S3 backup tools and scripts
-
Agent off-site backup authentication
Credentials for the pool are under Storage Pools → {pool} → Credentials.
Create your first Storage Pool
-
Open Storage Pools in the left sidebar.
-
Click Create Storage Pool (or go to
/app/storage-pools/new). -
Step 1 — Region: select an available region (healthy clusters show S3 endpoint).
-
Step 2 — Capacity:
-
Included 5 GiB (Pro) — free, uses your Pro entitlement (shown only while remaining).
-
Paid tiers — 10 GiB through 500 GiB monthly options (when checkout is enabled for your account).
-
-
Step 3 — Name: give the pool a clear name (for example Frankfurt Recovery). The wizard suggests a name from the region.
-
Click Create Storage Pool.
You land on the pool Objects page. Activation provisions vault space, DNS, TLS, and S3 credentials for that pool.
Tip: use separate pools for separate purposes (production backups vs config baselines vs a second geography). Always secure your account with Two-Factor authentication.
Navigation overview
Account overview (/app/storage-pools)
-
Total usage across pools
-
Per-pool cards (region, used %, recent activity)
-
Links into each pool’s Objects and Activity
Per-pool tabs
|
Tab |
Purpose |
|---|---|
|
Objects |
Main work surface — browse, upload, discover, deploy, restore, delete |
|
Activity |
Live jobs only (running backups, uploads, Send To, deploy, restore) |
|
Credentials |
S3 URL, bucket/slug, access key, secret — for WHM and automation |
|
Settings |
Read-only pool metadata (slug, region, quota, default flag) |
Objects and versions
Object browser layout
Objects are grouped by source server first (member folders), not dumped in a flat list.
-
Top level: folders per source member (hostname / site name).
-
Inside a member: service folders such as Backups, OpenLiteSpeed, MariaDB, NGINX, WordPress, SSL, Cron, Firewall, PHP, cPanel, Services.
-
Inside a service folder: individual objects.
Backups from a server stay under that server’s folder, then Backups — so an old site backup does not create a second root folder for the domain name.
Search flattens the tree and shows matching objects across the pool.
Object row actions
|
Button |
When it appears |
What it does |
|---|---|---|
|
Open |
Always |
Version history, metadata, compare, download |
|
Deploy |
Object is deployable (for example OLS vhost config, discovered |
Push config to compatible members |
|
Restore |
Object is a restorable backup snapshot |
Guarded restore on compatible members |
Versions
Each object has one or more versions (v1, v2, …). Version states include active, archived, and deprecated. Deploy and restore the default to the latest active version unless you pick another in the UI.
Open an object to:
-
See all versions with size, date, and source channel (agent backup, WHM S3, browser upload, discovery, and so on)
-
View file — inline text preview for configs (binary/archives prompt download instead)
-
Compare — diff against the previous version (text) or metadata/size for archives
-
Download a specific version
-
Send, Deploy, or Restore a specific version
Getting data into a Storage Pool
Managing Data
Member backups
From any enrolled server’s member tabs:
|
Source |
Typical path |
|---|---|
|
OpenLiteSpeed → Backups |
Full / site / web backup jobs |
|
MariaDB → Backup |
Database dump |
|
cPanel → account backup |
WHM |
|
Backups tab |
Snapshot backups |
When the job supports it, you choose the destination Storage Pool before the job runs. Progress appears under Activity (incoming lane).
Agent backups flow: check quota → collect → dump/package → upload → confirm stored. Install a current agent (v204+ recommended) for step-by-step byte progress.
WHM / cPanel S3 destination
-
Open Storage Pools → {pool} → Credentials.
-
Copy S3 endpoint, bucket (your pool slug), access key, and secret.
-
In WHM: Backup → Additional Destinations → S3 Compatible.
-
Set endpoint to your pool hostname, bucket to slug, path as documented on the Credentials page.
-
Run WHM backups — they land as objects in that pool.
Quota is enforced on the vault; over-quota uploads receive 507 Insufficient Storage.
Browser upload (Pro)
-
Open pool Objects.
-
Click Upload.
-
Select file(s) — large files upload in 16 MiB chunks (max 5 GiB per file).
-
After upload, publish: attach as a new version of an existing object, keep as a separate object, or cancel.
Configuration Discovery (Pro)
Baseline server configs without running a full backup:
-
On Objects, click Run Discovery.
-
Pick one member to scan (account-wide member list).
-
Choose categories (HAProxy, nginx, OpenLiteSpeed, PHP, SSL, MariaDB, cPanel, cron, firewall, apps, and more) or select all.
-
Options: include SSL private keys (off by default), include system package units under
/lib/systemd/system(off by default), force fresh baseline (ignore agent cache). -
Confirm — a read-only scan runs on that member only. Discovered text files become objects; unchanged files do not create new versions.
Live progress shows on the Objects page until complete. Requires agent v208+ for discovery (older agents may still be selectable; the job reports the real result).
Privacy: application configs (WordPress, Laravel, Docker Compose, and similar) store redacted copies — passwords and secrets are stripped. Redacted objects show Secrets redacted and cannot be deployed back to production.
Track Changes (daily discovery)
On a member folder row menu → Track Changes:
-
Enables a daily scheduled discovery for that member and pool.
-
Folder shows Tracked daily.
-
Only changed files create new versions (agent v219+ cache).
Agent CLI upload (large files)
On the server (agent v195+):
sudo /usr/local/bin/balctl_heartbeat.py --send-to-storage /path/to/file-or-folderThe agent packages the path, checks quota, uploads as an Agent upload object. Useful when browser limits are awkward.
Protection replication
Protection jobs (cPanel / OpenLiteSpeed standby) can replicate into vault storage tied to your account quota. If space is insufficient, the replication wizard prompts for Cloud Backup Storage add-ons.
Send To, Deploy, and Restore
Send To inbox
Delivers a copy to a member’s storage inbox (/var/lib/balctl/storage-inbox/) without changing production files. Use for inspection or manual steps.
-
Open object or version → Send To (or row menu).
-
Select one or more target members.
-
Confirm — progress appears in Activity (outgoing).
Deploy
Writes configuration to production paths on selected members. The agent:
-
Backs up the current file under
/tmp/balctl-storage-deploy/ -
Writes allowlisted paths only
-
Validates and reloads services where supported
-
Rolls back on failure
OpenLiteSpeed vhost deploy uses a guarded vhost path. Discovered configs deploy to the same member or another member with matching OS/service (agent v215+).
-
Click Deploy on a deployable object, or Deployment Wizard for multiple objects.
-
Pick version if prompted.
-
Select compatible targets (incompatible members are shown but blocked).
-
Review paths, optional reload OpenLiteSpeed, optional advanced path override.
-
Deploy now or schedule (wizard).
A live deploy spotlight shows progress per target member.
Restore
For backup objects linked to a snapshot (OLS site/web/full, cPanel account, database dumps):
-
Click Restore on object or version.
-
Select compatible members (OLS backups → OLS members, cPanel → cPanel, and so on).
-
Confirm — guarded restore runs on each target; Activity tracks progress.
Restore replaces production data for that backup scope — use with care.
Deployment Wizard
Objects → Deployment Wizard (Pro, when deployable/restorable objects exist):
-
Source member — same grouping as the object browser.
-
Objects — pick deploy and/or restore objects (one action type per run).
-
Targets — compatible members only.
-
Paths (deploy) or Confirm (restore).
-
Schedule (deploy only) — now or future time.
Activity, S3, Settings & Deleting Objects
Activity tab
Shows live work only — not historical logs.
|
Lane |
Examples |
|---|---|
|
Incoming |
Running backups, browser/S3 uploads, discovery archiving |
|
Outgoing |
Send To, deploy jobs, restore jobs |
Refreshes every few seconds. Completed or failed jobs disappear from Activity; the finished object remains in Objects.
Credentials and S3 setup
Storage Pools → {pool} → Credentials
|
Field |
Use |
|---|---|
|
Endpoint |
S3 URL for WHM, rclone, restic, etc. |
|
Bucket |
Pool slug |
|
Access key / Secret |
Authentication |
Regenerate keys from the panel if compromised. Keys are scoped to your account and pool.
WHM tips:
-
Use the regional endpoint hostname shown for your pool.
-
Do not point WHM at a shared global server name — each pool has its own hostname and vault assignment.
-
Ensure server egress IP is allowed (same network rules as agent heartbeat where applicable).
Settings
Settings shows:
-
Slug — used in URLs and S3 bucket name
-
Region — vault cluster
-
Quota / Included — capacity assigned to this pool
-
Default pool — whether this pool is the account default for new uploads
Rename and delete pool flows (if exposed in UI) respect active usage — check quota and objects before removing a pool.
Deleting objects
Pro: select objects with checkboxes → Delete selected, or delete from row menu / object details.
Deletion removes the logical object and version history from your storage. There is no way to recover a file after deletion.
Troubleshooting & Glossary
“Insufficient storage” / backup won’t start
Upload button disabled
-
Community plan — upgrade to Pro or buy storage quota.
-
Trial ended — subscribe to Pro.
Deploy / Restore target greyed out
-
Target member lacks the right stack (for example cPanel backup → non-cPanel server).
-
Object is redacted or not deployable/restorable.
-
Refresh members by reopening the modal (panel refreshes account member list).
Discovery stuck or slow
-
Member must be online with agent check-in.
-
Watch the progress panel — phases are agent-reported (v219+).
-
Force fresh baseline re-uploads everything and takes longer.
WHM S3 backup fails
-
Verify endpoint, bucket, keys from Credentials.
-
Confirm quota headroom.
-
Check vault region matches what you purchased in Stripe.
Objects missing after backup “succeeded”
-
Large archives may still be assembling — watch Activity until Confirm stored.
-
Look inside the correct member → Backups folder.
-
Use Search by filename or domain.
Glossary
|
Term |
Meaning |
|---|---|
|
Object |
A named thing in a pool (site backup, config file, dump) |
|
Version |
A point-in-time revision of an object |
|
Artefact |
Internal platform type (OLS vhost, cPanel account, etc.) — you see the friendly object name |
|
Publish |
Finalize an upload into the object catalog |
|
Send To |
Copy to member inbox without production changes |
|
Deploy |
Write config to production with rollback |
|
Restore |
Replay a backup snapshot on a compatible server |
|
Discovery |
Read-only inventory of config files into the pool |
Troubleshooting
Error Messages
Partner WHMCS Program
Additional ways to earn income for Partners
Partner Program Overview & Prerequisites
1. Partner overview and prerequisites
The ServersCTL Partner Program provides an immediate additional income stream for anyone who operates more than one cPanel server. By installing the ServersCTL agent on each cPanel server and configuring the servers inside a Generic Linux Pool within the ServersCTL app, WHMCS can act as an orchestrator to manage replicated cPanel accounts.
Partner mode connects three parts:
-
A source cPanel pool containing the servers that currently host customer accounts.
-
One or more approved recovery destinations controlled by the hosting provider.
-
A paired WHMCS installation that handles ordering, billing, customer access and support.
The provider remains the merchant and support owner. ServersCTL supplies the replication, verification, recovery and routing control plane behind the provider's service.
Before activation, confirm:
-
You are signed in as the ServersCTL account owner.
-
You have a Generic Linux pool containing at least one cPanel server.
-
The ServersCTL agent is enrolled and reporting a recent heartbeat from each server.
-
You have an eligible second cPanel member or a linked Cloud DR recovery target.
-
Every source and recovery server used by a WHMCS product is also configured as an enabled cPanel server in WHMCS.
-
WHMCS uses the same normalised server hostname reported by the ServersCTL agent.
2. Activate your Partner account
Open Account → Partners.
Existing ServersCTL account
-
Under Import your cPanel pool, choose the pool that hosts your WHMCS customer accounts.
-
Optionally enter your HTTPS support URL. This is shown when a customer needs assistance.
-
Select Activate Free Partner.
-
Review the imported pool, recovery destinations and current capacity.
Pools that are not cPanel pools, or that have no recently reporting agent, are not available for import.
New provider starting from WHMCS
A provider without a ServersCTL login can begin from the WHMCS module connection screen:
-
Enter the company name and owner email.
-
Accept the Partner terms and submit the signed registration request.
-
ServersCTL creates a provisional Partner workspace and connects the installation.
-
Open the owner claim email within 24 hours.
-
Choose a password of at least 12 characters to verify the owner and activate the account.
Infrastructure setup and hidden product drafts are available while the account is provisional. Customer provisioning and public status publication remain locked until the owner completes the claim.
3. Configure pools and recovery destinations
The Imported pool card controls the infrastructure available to Partner integrations.
Source pool
Choose the cPanel pool containing the live customer accounts sold from WHMCS. Account inventory is read from the enrolled cPanel servers and matched to WHMCS services by cPanel username and server identity.
Changing the source pool changes the inventory offered to the paired integration. Review existing protections before switching a live installation.
Standby targets
Select the cPanel servers that WHMCS customers may use as recovery destinations.
-
Pool member means another eligible cPanel member from the provider's infrastructure.
-
Cloud DR means a linked ServersCTL recovery target.
-
Leaving every target unchecked allows any eligible destination returned by the Partner API.
Free Partner uses direct server-to-server transfer and one recovery target by default. ServersCTL-hosted storage fallback requires an eligible paid Partner capability or an active Cloud DR subscription for the exact source pool and domain.
Support URL
Enter an HTTPS URL owned by the hosting provider, such as its WHMCS support department. Unsafe URL schemes are rejected. Customer-facing Partner pages do not link customers to ServersCTL support or pricing.
4. Connect and manage WHMCS installations
Download the current module from Account → Partners → WHMCS module, then follow the WHMCS module guide.
Approve a connection
-
Activate ServersCTL Replication in WHMCS.
-
Open the module and copy the displayed one-time pairing code.
-
In ServersCTL, open Account → Partners → Connect WHMCS securely.
-
Paste the code and select Approve this WHMCS.
-
Confirm that the success message shows the expected WHMCS domain and public egress IP.
The pairing code expires after 15 minutes. Approval binds the installation to the public source IP observed by ServersCTL.
Changed WHMCS public IP
If the WHMCS server's public egress IP changes, installation authentication is rejected. Open the module to generate a fresh pairing code, then approve it from Account → Partners. The new approval replaces the old IP binding.
Disconnect an installation
Only the ServersCTL account owner can disconnect a paired installation.
-
Find the installation under WHMCS module.
-
Select Disconnect.
-
Confirm the warning.
Disconnecting revokes that installation's sessions, nonces and pairing. Existing imported infrastructure, Partner customers and protection records are retained. The module must present a new one-time code before it can reconnect.
5. Plans, capacity and API access
The Capacity card shows the authoritative limits currently returned by ServersCTL:
-
Protected end customers used and allowed.
-
Paired WHMCS installations used and allowed.
-
Custom API keys used and allowed.
-
Permitted replication schedules.
-
Recovery targets per customer.
-
Direct-only or storage-fallback transfer capability.
The current Free Partner defaults are:
-
No expiry.
-
Five protected customers.
-
One WHMCS installation.
-
Weekly replication.
-
One recovery target.
-
No customer manual sync.
-
Direct server-to-server transfer with no general API storage fallback.
Paid Partner capabilities and prices may change. The values shown in Capacity and enforced by the Partner API are authoritative.
Upgrade
Select Upgrade Partner from the Capacity card to open the Partner checkout. WHMCS product pricing is still controlled separately by the hosting provider.
Advanced API access
Permanent sk_partner_… keys are for custom server-to-server integrations only. The official WHMCS module uses secure pairing and does not need one.
To create a custom-integration key:
-
Select Create key under Advanced API access.
-
Copy the plaintext key immediately; it is shown once.
-
Store it in a secret manager.
-
Revoke it from the same card when it is no longer needed.
The API root shown on the page ends in /api/partner/v1. See the Partner API technical reference for routes and security requirements.
6. Security and data handling
-
WHMCS never stores a ServersCTL password.
-
A new module creates its own 2048-bit RSA installation identity.
-
Pairing requests are signed and use timestamps and single-use nonces.
-
Installation sessions use short-lived, scoped tokens and are locked to the approved public source IP.
-
The module cannot use installation sessions to create or manage permanent Partner API keys.
-
SSH passwords used by guided server enrolment remain only in the current WHMCS request and are not sent to ServersCTL.
-
Cloudflare API tokens are encrypted while an order is pending, transferred through the authenticated Partner API, then removed from WHMCS after activation.
-
Downstream customer pages use the provider's brand. ServersCTL plan, price and support prompts remain visible only to the provider.
7. Troubleshooting and FAQ
No eligible cPanel pools
Confirm that the pool uses the Generic Linux profile, contains a cPanel server and has a recently reporting agent. Refresh Account → Partners after the next heartbeat.
No standby servers available
Add another cPanel member or link an eligible Cloud DR target. Confirm the destination agent is live and cPanel is detected.
Pairing code expired
Reload the WHMCS addon page to request a new code, then approve it within 15 minutes.
WHMCS reconnects with a new code
The most common cause is a changed public egress IP. Verify the IP shown in ServersCTL belongs to the WHMCS host before approving it.
An API key is requested during normal setup
Do not create or paste a permanent Partner key. Current module installations use secure pairing. The legacy-key field exists only for automatic migration of an older installation and is cleared after migration.
Does disconnecting WHMCS delete customer replicas?
No. Disconnect revokes only the selected installation's access. Infrastructure and Partner customer/protection records remain in ServersCTL.
Do downstream customers need ServersCTL accounts?
No. They order, pay, view status and use any permitted continuity actions inside the provider's WHMCS client area.
ServersCTL WHMCS cPanel Replication Module
1. Requirements and preparation
The module is designed for self-hosted WHMCS 8.13 LTS and 9.x. WHMCS Cloud does not support the required custom add-on and server modules.
Before installation, confirm:
-
PHP has the cURL and OpenSSL extensions enabled.
-
WHMCS can make outbound HTTPS requests to the configured ServersCTL Partner API.
-
You can write to the WHMCS
modules/addons/andmodules/servers/directories. -
Each production and recovery node is an enabled cPanel server in WHMCS.
-
The WHMCS server hostname exactly matches the normalised hostname reported by the corresponding ServersCTL agent.
-
Source and recovery servers have enrolled, recently reporting ServersCTL agents.
-
The source pool's Managed DNS configuration controls the protected domains.
-
The WHMCS host has a stable public egress IP, or you can approve a new pairing after it changes.
Take a normal WHMCS database and file backup before installing or upgrading any third-party module.
1.a. DNS Requirements for Replication
Replication requires reliable access to update the domain’s DNS records. This is especially important during a high-availability event, when ServersCTL activates the replicated cPanel account after the primary server becomes unavailable.
Do not use an API key from the primary cPanel server for DNS management. If that server goes offline, ServersCTL may be unable to update the DNS records and direct traffic to the recovery server.
There are two methods for managing DNS currently. You must use one of these methods to achieve High Availability.
cPanel DNS Cluster
DNS Clusters | cPanel & WHM Documentation
A cPanel DNS Cluster provides centralised DNS management for your cPanel servers. DNS changes made on the cluster are propagated to its connected servers. When configured appropriately, changes made within WHM or cPanel are also synchronised with the DNS Cluster hosts.
To use a cPanel DNS Cluster with ServersCTL, add an API DNS key from one of your cluster hosts. Customers point their domains to the cluster’s nameservers, and ServersCTL uses the API key to manage the required DNS records.
Cloudflare DNS
Customers using Cloudflare can provide a scoped API token that grants ServersCTL permission to read and update DNS records for the relevant zone. The customer enters the API Key during the order process.
2. Download and install
-
Sign in to ServersCTL.
-
Open Account → Partners.
-
Under WHMCS module, select Download WHMCS module.
- You can also download from the CDN. ServersCTL WHMCS cPanel Replication Module.
-
Extract
serversctl_replication.zipat the WHMCS root.
The ZIP is rooted at modules/ and installs both components:
|
Component |
Installed path |
Purpose |
|---|---|---|
|
Addon module |
|
Pairing, admin workspace, inventory, product catalogue, widget and customer continuity pages |
|
Server module |
|
WHMCS provisioning and lifecycle actions for protection services |
Do not move the bundled server module into the addon directory.
Activate the addon
-
In WHMCS, open System Settings → Addon Modules.
-
Find ServersCTL Replication.
-
Select Activate.
-
Grant access to the required WHMCS administrator roles.
-
Open the module from the WHMCS addon menu.
Activation creates the module's local mapping tables and the editable ServersCTL Replication - DNS Cutover email template. Deactivating the addon later does not stop existing protection at ServersCTL, but WHMCS management is unavailable until it is reactivated.
3. Pair WHMCS with ServersCTL
The current module uses cryptographic installation pairing. Do not create a permanent Partner API key for normal setup.
-
Open ServersCTL Replication in WHMCS.
-
Copy the one-time pairing code and note the displayed public source IP.
-
In a separate browser tab, sign in to ServersCTL as the account owner.
-
Open Account → Partners.
-
Paste the code under Connect WHMCS securely.
-
Select Approve this WHMCS.
-
Return to WHMCS and reload the addon.
The code expires after 15 minutes. Approval binds the module identity to the WHMCS domain and observed public egress IP. ServersCTL passwords and permanent API keys never enter WHMCS.
Create a new Partner account from WHMCS
If the provider has no ServersCTL account, use the registration form shown with the pairing code. Enter the company name and owner email, accept the terms, then open the emailed 24-hour claim link. The owner must set a password of at least 12 characters.
Customer provisioning remains locked until the claim is completed.
4. Configure the addon
Open System Settings → Addon Modules → ServersCTL Replication → Configure.
|
Setting |
Recommended value |
Effect |
|---|---|---|
|
API Base URL |
Production Partner API URL ending in |
Selects the ServersCTL control plane |
|
Legacy API Key (migration only) |
Empty |
Used once only when upgrading an old key-based installation |
|
Customer-facing brand name |
Your hosting brand |
Overrides the WHMCS company name in customer continuity pages |
|
Customer-facing logo URL |
HTTPS SVG or PNG |
Overrides the WHMCS theme logo; a transparent image at least 320 px wide is recommended |
|
Dark continuity experience |
On |
Uses the dark continuity workspace; disable to retain the light WHMCS presentation |
|
WHMCS status-area visibility |
Off initially |
|
|
Customer target choice |
Automatic |
|
|
Allow Cloudflare DNS |
As required |
Lets customers choose Cloudflare and enter a scoped token during purchase |
|
Allow customer test cutover |
According to policy |
Shows guarded recovery and failback controls to eligible customers |
|
Customer recovery action |
Replicate & Cut Over |
Takes and restores a fresh copy before DNS movement; DNS only uses the latest verified copy |
|
DNS cutover email notifications |
On |
Sends the editable WHMCS template after manual or automatic routing changes |
|
Offer weekly/daily/8-hour/4-hour/hourly replication |
Match your catalogue |
A frequency appears only when enabled, priced in WHMCS and allowed by the Partner plan |
The Partner API is the feature authority. Editing the open-source PHP module cannot grant schedules, targets, manual sync or storage capability that the Partner account does not have.
5. Connect servers and destinations
Open ServersCTL Replication → Servers & destinations.
The setup sequence is:
-
Connect servers — install the ServersCTL agent on each cPanel server involved.
-
Choose account servers — select the source pool containing live WHMCS accounts.
-
Allow destinations — choose the recovery cPanel servers customers may use.
-
Protect accounts — return to Account protection and enable services.
Existing ServersCTL fleet
Select the existing source cPanel pool and approved recovery destinations. Add the provider's HTTPS support URL, then save.
New fleet
The guided setup can create a cPanel pool and enrol a server:
-
Enter the server connection details.
-
Verify the displayed SSH host fingerprint against a trusted source.
-
Explicitly confirm the fingerprint.
-
Allow WHMCS to check root privilege, supported Linux/cPanel software and available disk space.
-
Wait for the agent installation and fresh heartbeat.
The SSH password is held only for the current PHP request and is not saved or sent to ServersCTL. WHMCS constructs the fixed install command locally and verifies the signed release manifest and file hashes before executing the downloaded agent as root.
6. Create and price the protection catalogue
From Servers & destinations, select Create protection catalogue.
The action is idempotent and can safely repair an existing catalogue. It creates:
-
Weekly replication addon.
-
Daily replication addon.
-
8-hour replication addon.
-
4-hour replication addon.
-
Hourly replication addon.
-
Additional Replication Target addon.
Weekly pricing is created at zero by default. Premium frequency addons remain disabled until the provider sets recurring prices in WHMCS.
Configure sales
-
Open the generated WHMCS product addons.
-
Set recurring prices for every billing cycle and currency you intend to sell.
-
Enable only the addon frequencies you want customers to order.
-
Confirm those same frequencies are enabled in the ServersCTL Replication addon settings.
-
Verify the Partner Capacity card allows them.
Customers see only the intersection of host-enabled, WHMCS-priced and Partner-authorized frequencies. The first selected destination is included in the frequency addon; each additional selected destination adds one Additional Replication Target line.
Do not manually create or request internal ServersCTL product IDs.
7. Protect existing accounts
Open ServersCTL Replication → Account protection.
The inventory cross-references active WHMCS shared-hosting and reseller services with live cPanel listaccts data. It identifies protected, unprotected, missing and unmatched accounts.
To protect a matched service:
-
Find the customer and cPanel account.
-
Select an approved recovery destination.
-
Choose the replication policy and permitted customer actions.
-
Start protection.
-
Confirm that the account reports an active protection state and a recovery point after the first completed copy.
Admin-managed accounts
Select Manually protect an account to show discovered cPanel accounts that do not match a WHMCS service. These are labelled Admin-managed.
Protecting an Admin-managed account does not create or modify a WHMCS client, hosting service, order or invoice. It is excluded from customer ordering.
Other administration tabs
-
Infrastructure map embeds the real, read-only and redacted cPanel pool overview, including linked Cloud DR recovery agents referenced by the pool's protection jobs. Use Open fullscreen for the wallboard view.
-
Servers & destinations controls source, recovery and support routing and creates the protection catalogue.
-
DNS credentials manages per-customer Cloudflare credentials and bindings. Customers are labelled by domain, cPanel account, WHMCS customer and service number.
8. Customer ordering and continuity console
The customer opens the provider-branded Hosting Protection or Account Continuity page in WHMCS.
The purchase wizard:
-
Lists eligible active shared-hosting or reseller accounts owned by that customer.
-
Lets the customer choose an available replication frequency.
-
Uses automatic target selection by default, or offers approved targets according to module policy.
-
Lets the customer choose cPanel DNS or Cloudflare when enabled.
-
Creates an addon-only WHMCS order attached to the parent hosting service.
-
Provisions protection after invoice payment or staff activation. ServersCTL activation completes before WHMCS marks the order active; a rejected remote activation leaves the add-on pending for a safe retry. Retrying that account reuses the same add-on and cannot create duplicate active protection billing.
For Cloudflare, the customer must supply the 32-character Account ID and an API token with Zone DNS read/edit access to the exact zone. Successful credential verification immediately creates the domain-specific Managed DNS binding, even when a later protection step needs to be retried. The secret is encrypted only while the order is pending and is removed from WHMCS after successful activation.
Weekly zero-value orders are closed as paid immediately and do not remain in the customer's unpaid-invoice count.
The continuity console can show:
-
Current live and standby server roles.
-
Last protected copy and replication schedule.
-
Recovery readiness and recent activity.
-
Manual replication when allowed.
-
DNS and credential state.
-
Guarded recovery and failback when allowed.
-
A customer self-service Remove protection action when safe.
Customer pages use the provider's brand. They do not display ServersCTL pricing, upgrade prompts or support links.
9. Recovery, DNS and lifecycle behavior
Recovery requirements
Recovery preflight checks:
-
An active protected customer and valid entitlement.
-
A completed protected copy.
-
A reachable receiving agent and standby endpoint.
-
Website/TLS readiness.
-
Authoritative DNS control for the protected domain.
-
An exact enabled WHMCS cPanel server matching the destination hostname.
For host-managed DNS, customer readiness messages use the WHMCS company/Customer Brand Name only. Credential labels, DNS hostnames and key timestamps remain operator-only.
The confirmation is one-time and expires. Never use a stale preflight for a later cutover.
DNS only
Uses the latest verified protected copy, then moves all enabled cPanel account A records together. This includes the apex and service names such as mail, webmail, cpanel and ftp.
Replicate & Cut Over
Starts a durable workflow that:
-
Takes a fresh full account copy.
-
Restores it to the recovery server.
-
Waits for agent, DNS, HTTP and TLS readiness.
-
Re-runs safety checks.
-
Moves authoritative DNS.
-
Updates the WHMCS hosting service's assigned server.
The workflow continues if the browser closes. A workflow is claimed by only one evaluator before routing changes begin, so overlapping scheduler runs cannot repeat confirmation or overwrite a successful cutover with a stale-route error. After cutover, native WHMCS cPanel login and quick actions use the active recovery host. Failback restores DNS and the WHMCS server assignment to production. If the synchronous WHMCS request is delayed after routing changes, the modal polls authoritative state and completes as soon as the requested route is visible.
Email notifications
When enabled, manual and automatic cutovers send ServersCTL Replication - DNS Cutover through WHMCS. Edit this template under the normal WHMCS email-template settings. Duplicate notifications for the same active server are suppressed.
Suspension, cancellation and termination
-
Addon suspension pauses the customer's protection access.
-
Unsuspension resumes it.
-
Addon cancellation or termination requests guarded cleanup.
-
Successful parent cPanel service termination cascades cleanup to mapped protection addons.
-
Future-dated cancellation does not remove protection before WHMCS terminates the service.
-
Cleanup waits if DNS is still routed to recovery and is retried by daily WHMCS maintenance after the safety condition is resolved.
-
Removing protection leaves the parent hosting service intact.
-
Open continuity consoles poll live state and automatically reconcile to the unprotected view when protection is removed in another tab or by staff; customers do not need to refresh manually.
The WHMCS cron is also used to reconcile the hosting service's assigned server with the authoritative DNS-active node after automatic cutover or an interrupted request.
10. Upgrade, disconnect and deactivate
Upgrade
-
Back up WHMCS.
-
Download the latest ZIP from Account → Partners.
-
Extract it over the existing module directories.
-
Open the addon and verify health, pairing and the installed version.
-
Run Create protection catalogue to repair catalogue definitions without duplicating them.
-
Test one non-production or designated recovery-test service.
An installation upgraded from an old key-based release can use its legacy Partner key once to bind the exact installation identity. The module clears the key after successful migration. Old API values containing only the ServersCTL site origin are resolved to /api/partner/v1.
Disconnect
Disconnect from ServersCTL → Account → Partners, not by deleting database rows. Disconnect revokes the selected installation's access while retaining imported infrastructure and protection records.
Deactivate
WHMCS addon deactivation leaves active protection running at ServersCTL. Reactivate and pair the addon to manage it again.
11. Troubleshooting
Pairing code is missing or expired
Reload the addon page and request a fresh code. Approve it within 15 minutes while signed in as the ServersCTL account owner.
Module returns an IP or authentication error
Compare the WHMCS server's current public egress IP with the IP shown under Account → Partners. A changed IP requires fresh pairing.
“PHP OpenSSL is required”
Enable the PHP OpenSSL extension for the PHP runtime serving WHMCS, then restart the relevant PHP/web service and reactivate the addon.
Connection fails
Confirm the API URL is HTTPS and ends in /api/partner/v1, PHP cURL is enabled, DNS resolves and the WHMCS server can make outbound HTTPS requests. Do not work around the error by adding a permanent Partner key.
No accounts are listed
Confirm:
-
The source pool is selected.
-
Its cPanel agents are live.
-
The WHMCS products are shared-hosting or reseller services in Active or Suspended state.
-
The WHMCS cPanel username matches a discovered live account.
-
The cPanel server hostname matches the ServersCTL agent hostname.
Use Manually protect an account only for accounts intentionally not sold through WHMCS.
A frequency does not appear to customers
It must be enabled in addon settings, have a valid recurring WHMCS price and be allowed by the Partner plan. Check all three.
Recovery preflight cannot map the destination
Add the recovery node as an enabled cPanel server in WHMCS. Its hostname must exactly match the hostname reported by the ServersCTL agent.
Cloudflare recovery is disconnected
Open the customer's DNS page, add a scoped Cloudflare credential and bind it to the exact protected domain. Credentials belonging to another customer or the provider's general DNS vault are not used as fallback.
Cancellation remains pending
Safe release test
Use only a designated recovery-test account. Verify a completed fresh copy, recovery preflight, authoritative DNS movement, HTTP response, WHMCS server reassignment and successful failback. Never run destructive recovery testing against an unrelated customer.
Uninstall The Agent
Fully remove the ServersCTL agent
Use this runbook when a server must stop heartbeating to ServersCTL/BalCTL and all local agent files should be removed before re-enrolling, moving between staging and production, or retiring the host.
The uninstall removes:
balctl-heartbeat.service/etc/balctl/agent.envand local discovered credential cache/usr/local/bin/balctl_heartbeat.py- local agent state under
/var/lib/balctl - local agent logs and temporary installer files when present
It does not remove customer workloads or platform software such as cPanel, OpenLiteSpeed, HAProxy, MariaDB/MySQL, Nginx, firewalld, CSF, websites, databases, DNS zones, or backup archives outside /var/lib/balctl.
Before removing the agent, delete or disable the matching member in the panel if the server is not being re-enrolled. That revokes the old enrollment path and stops the UI from expecting more heartbeats from this host.
Debian and Ubuntu
Run as root, or paste as a user with sudo access:
sudo systemctl stop balctl-heartbeat.service 2>/dev/null || true
sudo systemctl disable balctl-heartbeat.service 2>/dev/null || true
sudo systemctl stop balctl-agent-post-update.service 2>/dev/null || true
sudo systemctl reset-failed balctl-heartbeat.service balctl-agent-post-update.service 2>/dev/null || true

sudo rm -f /etc/systemd/system/balctl-heartbeat.service
sudo rm -f /etc/systemd/system/balctl-agent-post-update.service
sudo systemctl daemon-reload

sudo rm -f /usr/local/bin/balctl_heartbeat.py
sudo rm -f /usr/local/bin/balctl-agent.sh
sudo rm -rf /etc/balctl
sudo rm -rf /var/lib/balctl
sudo rm -rf /var/log/balctl
sudo rm -rf /tmp/balctl-* /tmp/balctl_agent_* /tmp/balctl-storage-deploy
If the original installer was extracted in the current directory, remove the extracted bundle too:
rm -f agent.zip balctl-agent.sh balctl_heartbeat.py balctl-heartbeat.service balctl-agent-version.txt
rm -rf systemd
Verify removal:
systemctl status balctl-heartbeat.service --no-pager
systemctl list-unit-files | grep -i balctl || true
pgrep -af balctl_heartbeat || true
test ! -e /etc/balctl/agent.env && echo "agent.env removed"
test ! -d /var/lib/balctl && echo "agent state removed"
Expected result: balctl-heartbeat.service is not found or inactive, no balctl_heartbeat.py process is listed, /etc/balctl/agent.env is gone, and /var/lib/balctl is gone.
Do not remove python3, unzip, wget, or curl unless you are certain they were installed only for the agent. They are common system tools and may be required by the OS or other services.
RHEL, AlmaLinux, Rocky Linux, and CentOS
Run as root, or paste as a user with sudo access:
sudo systemctl stop balctl-heartbeat.service 2>/dev/null || true
sudo systemctl disable balctl-heartbeat.service 2>/dev/null || true
sudo systemctl stop balctl-agent-post-update.service 2>/dev/null || true
sudo systemctl reset-failed balctl-heartbeat.service balctl-agent-post-update.service 2>/dev/null || true

sudo rm -f /etc/systemd/system/balctl-heartbeat.service
sudo rm -f /etc/systemd/system/balctl-agent-post-update.service
sudo systemctl daemon-reload

sudo rm -f /usr/local/bin/balctl_heartbeat.py
sudo rm -f /usr/local/bin/balctl-agent.sh
sudo rm -rf /etc/balctl
sudo rm -rf /var/lib/balctl
sudo rm -rf /var/log/balctl
sudo rm -rf /tmp/balctl-* /tmp/balctl_agent_* /tmp/balctl-storage-deploy
If the original installer was extracted in the current directory, remove the extracted bundle too:
rm -f agent.zip balctl-agent.sh balctl_heartbeat.py balctl-heartbeat.service balctl-agent-version.txt
rm -rf systemd
Verify removal:
systemctl status balctl-heartbeat.service --no-pager
systemctl list-unit-files | grep -i balctl || true
pgrep -af balctl_heartbeat || true
test ! -e /etc/balctl/agent.env && echo "agent.env removed"
test ! -d /var/lib/balctl && echo "agent state removed"
Expected result: balctl-heartbeat.service is not found or inactive, no balctl_heartbeat.py process is listed, /etc/balctl/agent.env is gone, and /var/lib/balctl is gone.
Do not remove python3, python39, unzip, wget, or curl Unless you are certain they were installed only for the agent. RHEL-family systems often rely on Python packages for operating system tooling.
Re-enrol after removal
After a full removal, use the current install command from the panel. Do not reuse an old command or old enrollment secret.
Production enrollments should point at:
- API base:
https://serversctl.com - Agent zip:
https://serversctl.com/agent/production/agent.zip
Staging enrollments should point at:
- API base:
https://staging.serversctl.com - Agent zip:
https://staging.serversctl.com/api/agent-assets/development/agent.zip
The hostname in the command must match the panel member hostname, and the server's egress IP must be in that member's allowed source IP list.