Part II - Linux Server Pools
- Member Tab Bar
- Overview Tab
- Security Tab
- OpenLiteSpeed Tab
- MariaDB/MySQL Tab
- cPanel Tab
- Status Tab
- Cron & Jobs Tab
- Restore Backups Tab
- Recipes Tab
- Monitoring Tab
- Settings Tab
Member Tab Bar
| Tab | Always in nav? | Active when |
|---|---|---|
|
Control panel
|
Yes
|
Always
|
|
Security
|
Yes
|
Always
|
|
OpenLiteSpeed
|
Yes (Generic)
|
Content when OpenLiteSpeed detected; else frosted not detected overlay
|
|
MariaDB
|
Yes (Generic)
|
Content when MariaDB/MySQL detected or cPanel-managed MySQL
|
|
cPanel
|
Yes (Generic)
|
Content when cPanel detected else frosted overlay
|
|
Status
|
Yes
|
Always — host/agent health summary
|
|
Cron & Jobs
|
Yes
|
Always
|
|
Restore Backups
|
Yes
|
Always
|
|
Recipes
|
Yes
|
Always
|
|
Monitoring
|
Yes
|
Always
|
|
Settings
|
Yes
|
Always
|
Overview Tab
Member Overview
Purpose: Host-level operations on this Server — OS family, uptime, services, quick actions, TLS.
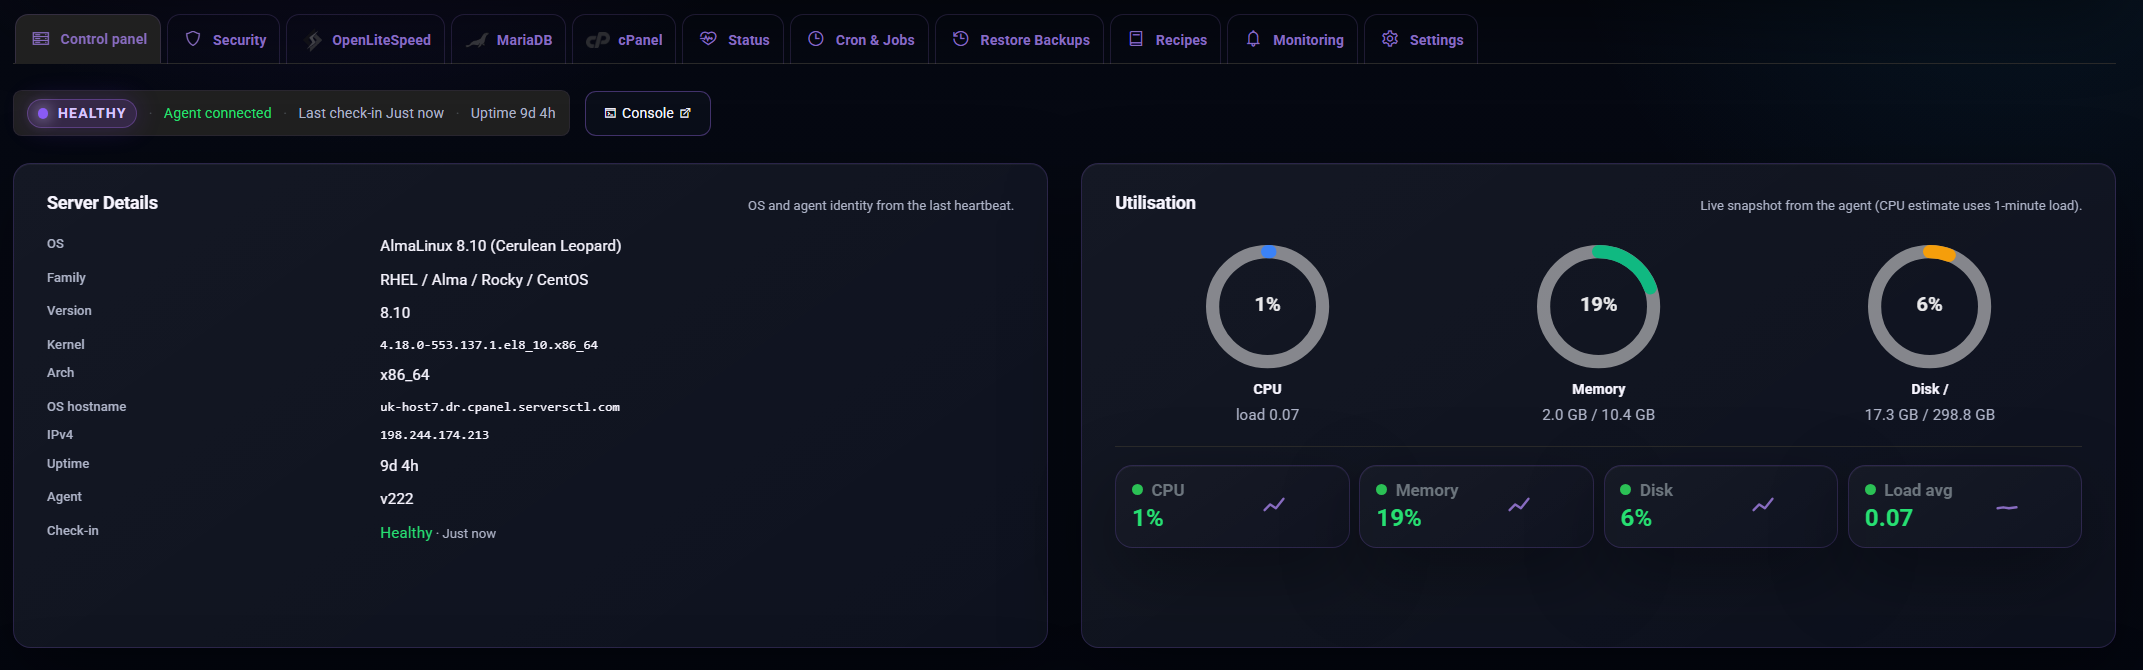
What you see
Security Tab
Member Security
Tab: Security.
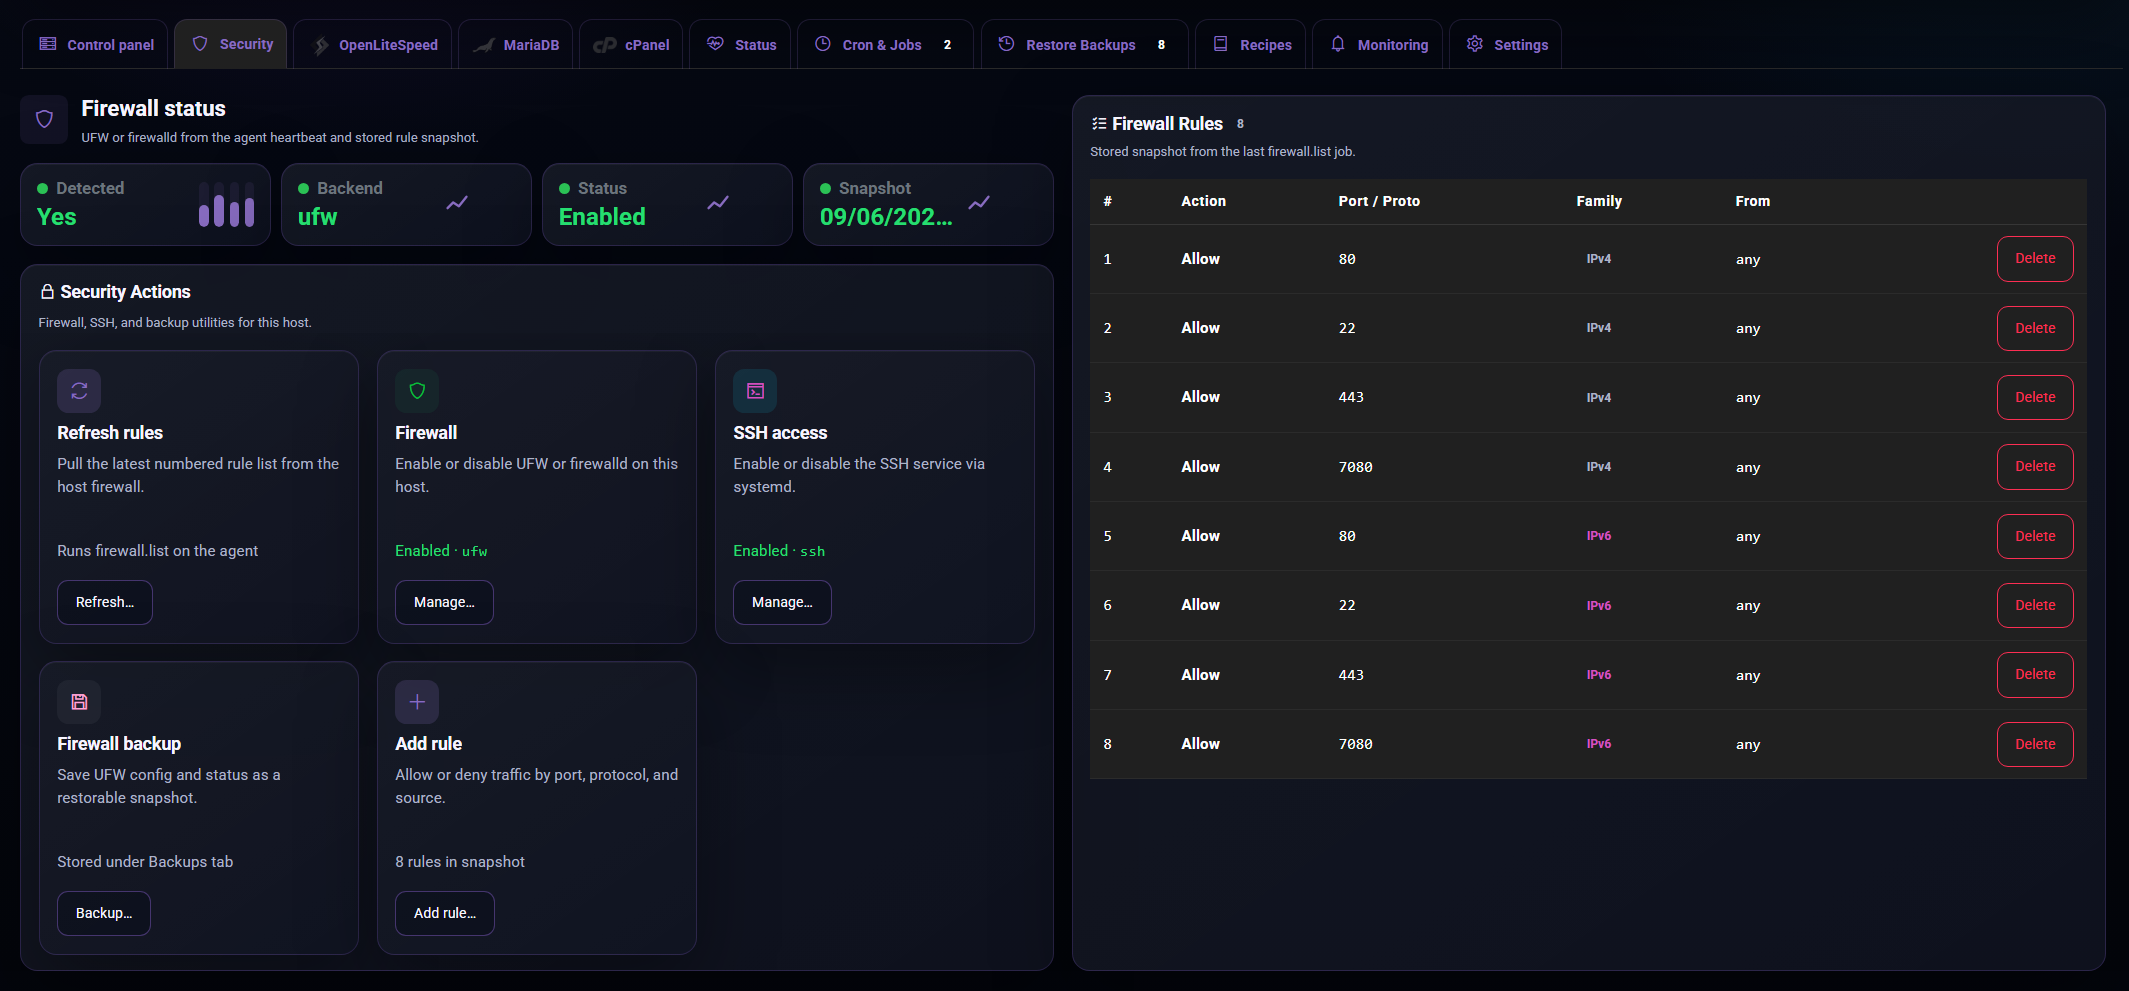
Use the Security tab to check and manage host-level firewall and SSH access for one server in a hosting pool. It is for server access control, not website, database, or cPanel account security.
What you can do
Supported firewall views are based on what the member reports, commonly UFW or firewalld.
Free and Pro
Community gives visibility. Pro gives controlled action: rule changes, firewall state changes, SSH access control, and firewall backups before risky changes.
Firewall status
Open Pool, choose the member, then select Security.
The firewall status area shows:
If the firewall is not detected, the member may not have a supported firewall installed or the agent may not have enough information yet. Refresh rules after fixing the host.
Refreshing rules
Use Refresh rules to pull a fresh firewall rule list from the host.
Refresh is useful after:
The rules table updates after the job completes. Check Cron & Jobs if the refresh does not appear to finish.
Managing the firewall
Use Firewall to enable or disable the detected firewall backend.
Before enabling the firewall:
Before disabling the firewall:
Existing rules are preserved. Refresh rules after the job completes so the table reflects the new state.
Adding rules
Use Add rule to allow, deny, or reject traffic by protocol, port, and source.
The form asks for:
Use narrow sources where possible. For example, allow SSH from your office or VPN range instead of allowing it from anywhere.
Deleting rules
Use Delete from the firewall rules table when a rule is no longer needed.
Deleting a rule can immediately change live traffic. Check the action, port, protocol, source, and comment before confirming.
SSH access
Use SSH access to enable or disable the SSH service on the host.
Disabling SSH may close current sessions and block new SSH logins. The balctl agent should continue running, so you can turn SSH back on from the Security tab when the member is still checking in.
Use this carefully. If the agent stops checking in and SSH is disabled, you may need console access from your server provider.
Firewall backup
Use Firewall backup before large firewall changes, migrations, or security cleanups.
Firewall backups are stored with the member's backups so they can be found from the backup and restore areas. Keep a backup before removing broad rules or changing access to production services.
What this tab does not manage
The Security tab is host-level only.
OpenLiteSpeed Tab
Member OpenLiteSpeed
Tab: OpenLiteSpeed.
Sub Tabs: Overview, Recovery Wizard
Use the OpenLiteSpeed tab to manage standalone OpenLiteSpeed servers in a hosting pool. It gives you one place to check the web server, create recovery points, restore sites, and move sites to another compatible OpenLiteSpeed server.
This tab is for servers running OpenLiteSpeed directly. cPanel servers use the cPanel tools instead.
What is included
| Area | What you use it for |
|---|---|
| Overview | Check server health, open the WebAdmin panel, reload or restart OpenLiteSpeed, test configuration, update PHP packages, and create a server config backup. |
| Backups | Create site, web-file, database, and full recovery points for OpenLiteSpeed applications. |
| Transfer Wizard | Move an OpenLiteSpeed site to another compatible OpenLiteSpeed member. |
Community and Pro
| Feature | Community | Pro |
|---|---|---|
| View detected OpenLiteSpeed status | Included | Included |
| Open WebAdmin link and view basic server details | Included | Included |
| Refresh detected applications | Included | Included |
| View linked databases when discovered | Included | Included |
| Create OpenLiteSpeed backups | Upgrade required | Included |
| Restore OpenLiteSpeed backups | Upgrade required | Included |
| Transfer sites between OpenLiteSpeed servers | Upgrade required | Included |
| Automatic DNS cutover after restore or transfer | Upgrade required | Included |
Pro turns this tab from a read-only view into a recovery and migration workspace. It is designed for operators who need to move sites quickly, keep usable recovery points, and reduce manual rebuild work.
Overview
Open Pool, choose the OpenLiteSpeed member, then select OpenLiteSpeed.
The Overview area shows:
- WebAdmin access for the selected member.
- Current service state and key server details.
- Actions for reload, restart, configuration test, backup, upgrade, and PHP package updates.
- Recent log output when available.
Use Config test before restarting a busy server. If the test fails, fix the configuration first so the web server does not reload into a broken state.
Backups
Open Backups to work with detected OpenLiteSpeed applications.
Each application card shows the site name, document root, PHP and TLS information when available, linked databases when discovered, and the latest recovery point.
To create a recovery point:
- Select the application.
- Choose Backup now.
- Pick the backup type.
- Confirm the storage estimate and start the backup.
Common backup types:
| Backup type | Use it when |
|---|---|
| Full site backup | You want the safest recovery point for a real application. |
| Files only | You only changed web files, themes, plugins, uploads, or static content. |
| Databases only | You only need a database snapshot for a linked schema. |
Recovery points can be restored, downloaded, inspected, or deleted from the same workspace.
OpenLiteSpeed Transfer Wizard
Use the OLS Transfer Wizard when you want to move an OpenLiteSpeed site to another compatible OpenLiteSpeed member.
Transfer a Site (OpenLiteSpeed to OpenLiteSpeed)
To transfer a site:
- Open Transfer Wizard.
- Select the source application.
- Choose a compatible destination member.
- Confirm whether DNS will be updated manually or automatically.
- Start the transfer and watch the progress panel.
Destination servers must be compatible. cPanel servers are not valid OpenLiteSpeed transfer targets, even if they also run LiteSpeed or expose similar services.
DNS cutover
After a restore or transfer, DNS still decides where visitors go.
| Option | Availability | What happens |
|---|---|---|
| Manual DNS update | Community and Pro | The site is moved or restored, then you update the A record yourself. |
| Automatic DNS update | Pro | The platform updates the saved DNS provider record after the operation completes. |
Automatic DNS is useful when you want a cleaner migration flow and already have a DNS key saved for the domain or account.
Good operating habits
- Run a full backup before major changes.
- Use configuration test before restarting OpenLiteSpeed.
- Keep enough storage for at least one known-good recovery point per important site.
- Confirm DNS after any restore or transfer.
- Use Pro for production migration and recovery workflows where speed matters.
Direct Transfer security model
Direct Transfer is not an open file receiver and it is not general-purpose SSH access. The API acts as the control plane for a single copy operation:
- The authenticated operator starts a transfer. The dashboard calls the Worker with the selected source member, destination member, cPanel username, route mode, and DNS handling choice. The Worker checks plan access, pool ownership, WHM/cPanel compatibility, account state, agent versions, destination disk, and route availability before creating the run.
- API creates a one-use session. The Worker mints a random session ID, records the exact source node, destination node, account username/domain, expected byte count, destination address, source IP filter, status, and expiry. Session APIs reject unknown, expired, terminal, wrong-role, or wrong-status sessions.
- Only enrolled agents can advance it. Source and destination agents call back using their normal enrolled heartbeat credentials. The Worker verifies that the calling node is the recorded source or destination for that session before accepting prepare, public-key registration, progress, transfer-complete, or restore-complete updates.
- The source generates an ephemeral SSH key. The source agent creates a session-scoped keypair for this transfer. The private key stays on the source server. The public key is sent to the Worker, which queues an authorised job for the destination agent.
- Destination installs a restricted receiver key. The destination agent writes the public key to root
authorized_keyswith a forced command for chunk receive only, plusfrom=<source-ip>,no-port-forwarding,no-X11-forwarding,no-agent-forwarding,no-pty, andno-user-rc. A matchingsession.jsonmust exist before any chunk is accepted. - Chunks are individually checked. The source agent streams fixed-size chunks over SSH. The forced receiver accepts only
sessionId, chunk index, and chunk SHA-256, reads the chunk from stdin, verifies the chunk hash, and writes it under that session's temporary receive directory. - Archive integrity is checked before restore. After transfer, the destination agent assembles the archive and verifies the final SHA-256 recorded on the session/run before calling
restorepkg. - Session cleanup is automatic. On success, failure, expiry, or revoke, the destination removes the matching
authorized_keysline and deletes the temporary session directory. The Worker will also queuecpanel_account_sync_revokeif the run fails before normal cleanup.
The session lifetime is time-limited. It has a 30-minute minimum and scales with package size using a conservative transfer-rate estimate, so a large package has enough time to complete without leaving a permanent receiver open.
MariaDB/MySQL Tab
Standalone database server
Overview
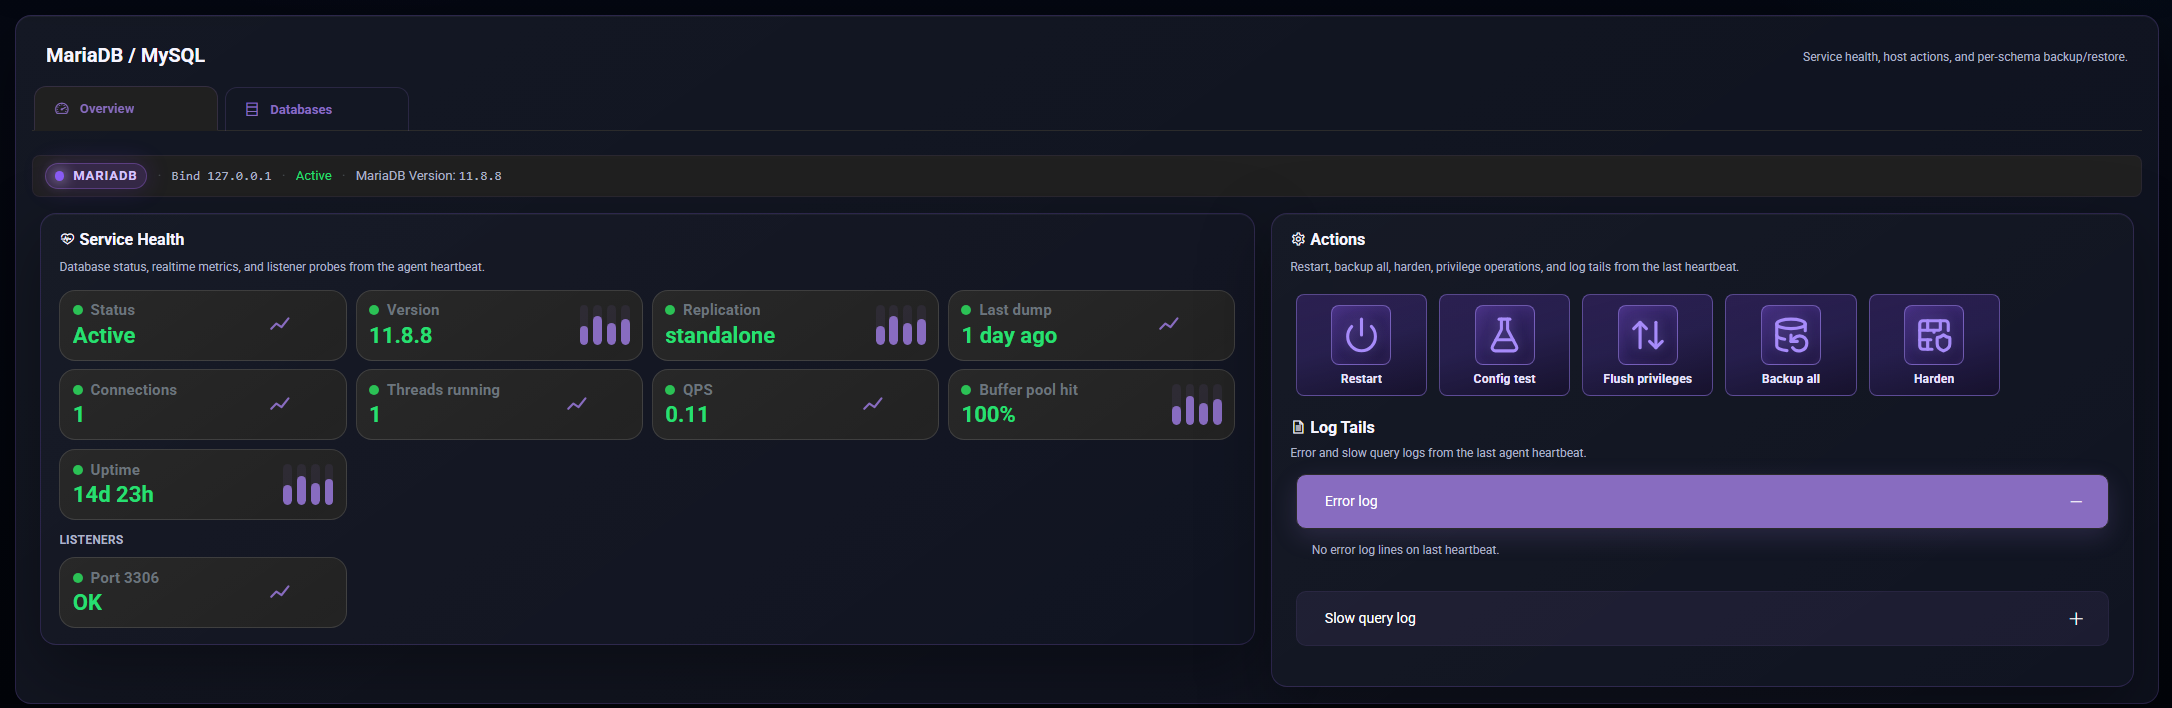
Use the MariaDB / MySQL tab to check database service health, refresh the live database inventory, create database backups, and restore database versions when needed.
This tab appears for Generic Linux members. It is useful for dedicated database servers, OpenLiteSpeed servers with local databases, and cPanel servers where MySQL is managed by WHM.
What is included
| Subtab | What you use it for |
|---|---|
| Overview | Check database service health, listener status, version, replication role, recent backup age, logs, and service actions. |
| Databases | View live schemas, refresh discovery, see backup versions, back up selected schemas, restore versions, and delete old database backups. |
Free and Pro
| Feature | Community | Pro |
|---|---|---|
| View service health and heartbeat-reported database status | Included | Included |
| View version, listener, uptime, and basic metrics when available | Included | Included |
| View live database inventory | Included | Included |
| Refresh live database discovery | Included | Included |
| View existing backup versions | Included when available | Included |
| Back up all databases | Upgrade required | Included |
| Back up selected schemas | Upgrade required | Included |
| Restore database backup versions | Upgrade required | Included |
| Delete managed database backup versions | Upgrade required | Included |
| Choose a Storage Pool for database backups | Upgrade required | Included |
Pro is for real database operations: scheduled recovery coverage, one-click backups before risky changes, schema-level restore, and storage-aware backup management.
Overview subtab
Open Pool, choose the member, select MariaDB / MySQL, then open Overview.
The Overview subtab shows:
- Database service status.
- Server version.
- Replication or Galera role when reported.
- Last all-databases backup age.
- Listener status, usually port 3306.
- Connections, running threads, queries per second, uptime, and buffer pool signals when available.
- Error and slow-query log tails from the latest member report.
Available actions include:
| Action | Use it when |
|---|---|
| Restart | The database service needs a controlled restart. |
| Config test | You want to check database configuration before restarting. |
| Flush privileges | Database grants or users were changed and privileges need reloading. |
| Backup all | You want one recovery point containing all databases on the member. |
| Harden | You want the platform to apply supported database hardening guidance or actions. |
On cPanel servers, the tab may show a cPanel host notice. Use the cPanel tab for WHM account work, but use Databases here to refresh and back up discovered application schemas.
Databases subtab
Open Databases to work with the live schema inventory.
The Databases subtab shows:
- Live schemas currently found on the server.
- Size and table count when available.
- Database engine details where reported.
- Backup version count for schemas with stored recovery points.
- The latest backup age for each backed-up schema.
- A discovery cache age so you know how fresh the list is.
Use Refresh live when you have added databases, restored accounts, moved sites, or changed application database settings. On cPanel and web hosts, discovery can also find application-linked schemas from known config files.
Backing up databases
To back up all databases:
- Open Overview.
- Choose Backup all.
- Pick the Storage Pool if more than one is available.
- Review the estimate and start the backup.
To back up selected schemas:
- Open Databases.
- Open the menu on the schema card.
- Choose Backup.
- Confirm the schemas and Storage Pool.
- Start the backup.
The backup modal warns when the selected Storage Pool does not have enough remaining space.
Restoring versions
To restore a database version on Pro:
- Open Databases.
- Open the menu on a schema with backup versions.
- Choose Versions.
- Select the version you want.
- Choose Restore and confirm.
Restoring a database can overwrite live data. Check the version date, source member, and schema name before confirming.
Deleting versions
Use Delete from the versions modal when you no longer need a stored database backup. Deletion is permanent, so keep at least one known-good recovery point for important schemas.
cPanel-managed MySQL
On cPanel servers, MySQL is shared across accounts. That means:
- WHM account tasks stay in the cPanel tab.
- Database inventory and schema backups stay in MariaDB / MySQL.
- Use Refresh live after adding or restoring cPanel accounts.
- Application-linked schemas may appear after discovery even when root-level metrics are limited.
Galera (wsrep) (In Alpha)
When Galera is enabled, the agent will report the wsrep state. ServersCTL does not run quorum, SST, or writer election. DNS is active ≠ Galera primary.
cPanel Tab
Use the cPanel member tab to manage a WHM server in a ServersCTL hosting pool. It brings server health, WHM accounts, account transfers, recovery actions, and cPanel service controls into one workspace for the selected server.
The cPanel tab is for WHM/cPanel servers. OpenLiteSpeed-only servers use the OpenLiteSpeed tab instead.
Free and Pro
| Feature | Community | Pro |
|---|---|---|
| View cPanel overview and service state | Included | Included |
| View Operations health, metrics, logs, and WHM API status | Included | Included |
| View all WHM accounts and account details | Included | Included |
| Manual Agent Transfer between cPanel servers | Included | Included |
| Create, suspend, unsuspend, modify, or terminate accounts | Upgrade required | Included |
| One-time cPanel login links | Upgrade required | Included |
| cPanel account backups and AutoSSL actions | Upgrade required | Included |
| cPanel service restarts, config checks, hardening, and config backup | Upgrade required | Included |
| Automatic DNS update during Agent Transfer | Upgrade required | Included |
| Migrate & Recovery live WHM transfers | Upgrade required | Included |
| Pool Protection and scheduled replication | Upgrade required | Included |
Community is enough for visibility and manual account copy workflows. Pro is for production hosting operations: account management, automated DNS cutover, recovery, live transfers, backups, and service control.
Requirements
For the full cPanel workspace:
- The server must be enrolled as a pool member.
- The balctl agent must be checking in.
- cPanel/WHM must be detected.
- WHM must be linked for account and migration tools.
- A second compatible cPanel member is needed for transfer workflows.
- Saved DNS keys are needed for automatic DNS updates.
If the tab is visible but actions are unavailable, check the member Status tab, WHM link state, and plan level.
Subtabs
| Subtab | What you use it for |
|---|---|
| Overview | See cPanel protection state, service badges, quick actions, WHM links, and account recovery topology. |
| Operations | Check cPanel service health, disk, network, WHM API status, metrics, logs, and server-level actions. |
| Accounts | List WHM accounts, inspect account details, create accounts, suspend, unsuspend, back up, log in, run AutoSSL, and terminate accounts. |
| Agent Transfer | Copy one account directly to another compatible cPanel server using the installed agents. |
| Migrate & Recovery | Start and monitor WHM live transfer sessions between cPanel members. |
Some subtabs only appear after the server is detected as cPanel and WHM is linked for the pool.
Overview subtab
Use Overview as the first stop for a cPanel member.
The Overview subtab shows:
- The cPanel protection and recovery topology.
- Whether accounts are protected or have standby coverage.
- Service stack badges.
- Quick links to WHM and Webmail when available.
- Quick actions such as account creation or backup where available.
- WHM audit information when the server is linked.
Use this subtab to understand whether the selected server is acting as the live source, standby, or an unprotected cPanel host.
Operations subtab
Use Operations for server-level cPanel health and maintenance.
The Operations subtab shows:
- cPanel health and license state.
- Web, mail, cPanel, database, and related service state.
- Listener and network information.
- Disk usage and server metrics.
- WHM API status and DNS drift information.
- cPanel and mail log tails.
Common Pro actions:
| Action | Use it when |
|---|---|
| Restart web | Apache/httpd is down or web traffic needs a controlled restart. |
| Restart mail | Exim or Dovecot needs a controlled restart. |
| Restart cPanel | WHM/cPanel services are unhealthy. |
| Config check | You want to check cPanel configuration health before changes. |
| Backup config | You want a cPanel metadata/config recovery point. |
| Harden ports | You want supported cPanel firewall/service hardening. |
| Refresh snapshot | You want the latest WHM service snapshot and DNS drift state. |
Check Cron & Jobs after starting any action.
Accounts subtab
Use Accounts to work with WHM accounts on the selected server.
The Accounts subtab shows:
- All WHM accounts returned for the member.
- Domain, username, IP, plan, email, disk usage, and status where available.
- Filters for all, active, and suspended accounts.
- Account details in a drawer or modal.
- Protection and DNS hints when configured.
Community users can view the full list and inspect details. Pro users can also run account actions.
Pro account actions:
| Action | What it does |
|---|---|
| Create account | Creates a WHM account with username, domain, password, plan, and contact email. |
| Suspend / Unsuspend | Changes whether an account can be used. |
| Login | Opens a one-time cPanel login session. |
| Backup | Creates a cPanel account backup. |
| Change package | Moves the account to another WHM package. |
| Reset password | Generates and shows a new password once. |
| Run AutoSSL check | Starts an AutoSSL check for accounts. |
| Terminate | Permanently removes the account after confirmation. |
Termination is destructive. The confirmation asks you to type the domain so accidental deletion is harder.
Agent Transfer subtab
Agent Transfer is the member cPanel inner tab for one-shot cPanel → cPanel account copies between enrolled pool members. Agents package the source account, move the archive over a direct route or through user storage, restore on the destination with restorepkg, and optionally swing the DNS after the copy succeeds.
Direct Transfer security model
Direct Transfer is not an open file receiver and it is not general-purpose SSH access. The API acts as the control plane for a single copy operation:
- The authenticated operator starts a transfer. The dashboard calls the Worker with the selected source member, destination member, cPanel username, route mode, and DNS handling choice. The Worker checks plan access, pool ownership, WHM/cPanel compatibility, account state, agent versions, destination disk, and route availability before creating the run.
- API creates a one-use session. The Worker mints a random session ID, records the exact source node, destination node, account username/domain, expected byte count, destination address, source IP filter, status, and expiry. Session APIs reject unknown, expired, terminal, wrong-role, or wrong-status sessions.
- Only enrolled agents can advance it. Source and destination agents call back using their normal enrolled heartbeat credentials. The Worker verifies that the calling node is the recorded source or destination for that session before accepting prepare, public-key registration, progress, transfer-complete, or restore-complete updates.
- The source generates an ephemeral SSH key. The source agent creates a session-scoped keypair for this transfer. The private key stays on the source server. The public key is sent to the Worker, which queues an authorised job for the destination agent.
- Destination installs a restricted receiver key. The destination agent writes the public key to root
authorized_keyswith a forced command for chunk receive only, plusfrom=<source-ip>,no-port-forwarding,no-X11-forwarding,no-agent-forwarding,no-pty, andno-user-rc. A matchingsession.jsonmust exist before any chunk is accepted. - Chunks are individually checked. The source agent streams fixed-size chunks over SSH. The forced receiver accepts only
sessionId, chunk index, and chunk SHA-256, reads the chunk from stdin, verifies the chunk hash, and writes it under that session's temporary receive directory. - Archive integrity is checked before restore. After transfer, the destination agent assembles the archive and verifies the final SHA-256 recorded on the session/run before calling
restorepkg. - Session cleanup is automatic. On success, failure, expiry, or revoke, the destination removes the matching
authorized_keysline and deletes the temporary session directory. The Worker will also queuecpanel_account_sync_revokeif the run fails before normal cleanup.
The session lifetime is time-limited. It has a 30-minute minimum and scales with package size using a conservative transfer-rate estimate, so a large package has enough time to complete without leaving a permanent receiver open.
This is the direct account transfer workspace. It is separate from scheduled Protection and separate from the WHM live transfer wizard.
To transfer an account:
- Open Agent Transfer on the source cPanel member.
- Choose or drag an active account.
- Choose a compatible destination cPanel member.
- Review the route preflight.
- Choose DNS handling.
- Start the transfer.
- Watch the transfer spotlight until it completes.
DNS handling:
| Option | Availability | What happens |
|---|---|---|
| Manual DNS update | Community and Pro | The account is copied. You update DNS yourself when ready. |
| Update A record automatically | Pro | ServersCTL uses a saved Cloudflare or cPanel DNS key after restore succeeds. |
The direct route is preferred. If direct transfer cannot work and user storage is available, the transfer can use storage as the fallback route. If storage is required but unavailable, add storage or use another transfer method.
After a successful direct transfer, the temporary transfer access is cleaned up. The account archive may remain on the destination server for the user to remove when they are finished with it.
Migrate & Recovery subtab
Use Migrate & Recovery for live WHM transfer sessions between cPanel members.
This is a Pro workflow for native WHM transfers. It shows outgoing and incoming sessions for the selected server, including route, direction, status, DNS cutover state, and last update time.
To start a live WHM transfer:
- Open Migrate & Recovery.
- Choose Start transfer.
- Pick the account.
- Pick the target cPanel server.
- Review preflight checks.
- Decide whether DNS cutover should run.
- Confirm and monitor the session.
Use the refresh button to update transfer sessions. If a completed transfer had DNS cutover enabled but DNS failed, use the retry option after fixing the DNS key or zone issue.
Agent Transfer vs Migrate & Recovery vs Protection
| Tool | Best for |
|---|---|
| Agent Transfer | One-off account copy using ServersCTL agents. Community can use manual DNS; Pro can automate DNS. |
| Migrate & Recovery | Pro live WHM transfer sessions between cPanel members. |
| Pool Protection | Pro scheduled standby replication and failover readiness across protected accounts. |
Use Agent Transfer when you want a direct copy now. Use Protection when you want ongoing standby coverage. Use Migrate & Recovery when you specifically want the WHM transfer workflow.
WHM Binding
Full WHM API when member matches pool host. Run WHM link check recipe after DNS connect.
Status Tab
Use the Status tab to see whether a server is online, reporting correctly, and ready for work. It is the first place to check when a member looks stale, jobs are not moving, or a server has not checked in recently.
What you can see
The Status tab shows a live operational summary for the selected member:
| Area | What it tells you |
|---|---|
| Heartbeat | Whether the member is checking in and how recent the last signal was. |
| Agent version | The installed agent version and whether an update is available. |
| Host details | Hostname, operating system, uptime, and basic identity details. |
| Resources | CPU, memory, disk, and other capacity signals when reported by the member. |
| Security basics | Firewall and SSH status when available. |
| Updates | Whether the server appears to need package updates. |
Some specialist members may show a tailored status view for their role, such as HAProxy.
Free and Pro
| Feature | Community | Pro |
|---|---|---|
| View heartbeat and online state | Included | Included |
| View agent version and host details | Included | Included |
| View reported resource usage | Included | Included |
| View firewall, SSH, and update signals when reported | Included | Included |
| Use advanced tabs that act on status signals | Limited | Included |
| Faster operational recovery using backup, transfer, and automation tools | Upgrade required | Included |
The Status tab is included because every user needs to know whether their member is healthy. Pro adds the tools around that signal: backup, restore, transfer, scheduling, and automation.
How to use it
- Open the pool.
- Select the member.
- Open Status.
- Check the heartbeat first.
- Review resource, update, firewall, and agent signals.
If the server is online but a feature is not behaving as expected, check Cron & Jobs next. That tab shows whether recent actions are queued, running, completed, or failed.
Common checks
| What you see | What it usually means |
|---|---|
| Recent heartbeat | The agent is checking in and the member can be managed. |
| Stale heartbeat | The server, network, or agent may need attention. |
| Agent update available | Update the agent before testing new features. |
| High disk usage | Backups, restores, and transfers may fail unless space is freed. |
| Firewall warning | Remote access or service traffic may be blocked. |
Cron & Jobs Tab
Member Cron & Jobs
Use Cron & Jobs to see scheduled work and recent server tasks for a member. It helps you confirm whether backups, discovery runs, refreshes, and other actions are queued, running, completed, or failed.
What it is for
| Area | What you use it for |
|---|---|
| Schedules | View and manage recurring jobs for the selected member. |
| Recent jobs | Check the latest actions sent to the member. |
| Run now | Trigger a supported scheduled task immediately when available. |
| History | See whether work completed or needs attention. |
Times are shown in the product interface for easy reading. When you are coordinating with logs or support, include the member name and the job time shown in the UI.
Free and Pro
| Feature | Community | Pro |
|---|---|---|
| View recent jobs and outcomes | Included | Included |
| See existing schedules | Included | Included |
| Create recurring schedules | Upgrade required | Included |
| Edit, pause, resume, or delete schedules | Upgrade required | Included |
| Run scheduled jobs on demand | Upgrade required | Included |
| Use backup and discovery automation | Upgrade required | Included |
Pro is where Cron & Jobs becomes automation instead of just visibility. It is intended for teams that want regular backups, routine discovery refreshes, and repeatable maintenance without manual checklists.
Using recent jobs
Open Cron & Jobs and look at the recent job list.
Each job usually shows:
- What action was requested.
- The current state.
- When it started or finished.
- The member that handled it.
- Any visible failure reason.
If a job fails, use the failure message to decide the next step. Common causes are stale agent heartbeat, missing storage, low disk space, incompatible service type, or a feature that requires Pro.
Using schedules
Schedules are useful for repeated operational work.
To create a schedule on Pro:
- Open Cron & Jobs.
- Choose Add schedule.
- Pick the job type.
- Set the timing.
- Confirm the target and save.
Use schedules for routine backups and refresh tasks. Avoid scheduling risky changes unless the result is easy to verify and recover from.
Good operating habits
- Check recent jobs after starting a backup, restore, transfer, or discovery run.
- Keep schedules simple and clearly named.
- Pause schedules during major migrations if they could interfere.
- Use Pro schedules for regular backup and discovery coverage.
Restore Backups Tab
Use Restore Backups to find recovery points for a member and put them back when something needs to be recovered. It is the recovery workspace for server backups, service backups, application backups, and other stored recovery points that belong to the member.
What you can do
| Area | What it is for |
|---|---|
| Recovery timeline | Browse available backups by date and type. |
| Backup details | Inspect size, source, version, and what the recovery point contains. |
| Restore | Put a compatible backup back onto a server. |
| Download | Download a recovery point when available. |
| Delete | Remove old backups you no longer want to keep. |
| Run backup | Create a fresh backup when the member and plan support it. |
Free and Pro
| Feature | Community | Pro |
|---|---|---|
| View available recovery points | Included when storage is connected | Included |
| Inspect backup details | Included | Included |
| Download supported backups | Included when allowed by storage policy | Included |
| Create new cloud backups | Upgrade or storage required | Included with connected storage |
| Restore backups from the UI | Upgrade required | Included |
| Delete managed recovery points | Upgrade required | Included |
| Cross-member restore to compatible servers | Upgrade required | Included |
Pro gives you the recovery controls that matter during an incident: create fresh backups, restore faster, and recover to compatible members without turning the process into manual file handling.
Finding a backup
- Open the pool.
- Select the member.
- Open Restore Backups.
- Use the timeline or filters to find the backup type you need.
- Open the backup details before restoring.
Check the source member, backup type, date, and size before you restore. For full server or site backups, confirm the destination is compatible.
Restoring a backup
To restore on Pro:
- Select the recovery point.
- Choose Restore.
- Review the compatibility and warning messages.
- Confirm the target.
- Start the restore.
- Watch the job progress in Cron & Jobs if needed.
Restores are intentionally gated because they can overwrite live files, service configuration, databases, or accounts. If a restore target is incompatible, choose another server or use the correct product tab for that service.
Creating a fresh backup
Use Run backup when you want a new recovery point before maintenance, upgrades, migrations, or risky changes.
Compatibility rules
Backups should be restored to compatible servers.
| Backup type | Restore expectation |
|---|---|
| OpenLiteSpeed site backups | Restore to compatible OpenLiteSpeed members. |
| cPanel account backups | Restore to compatible cPanel members. |
| Database backups | Restore where the database engine and target are suitable. |
| Service configuration backups | Restore only where the operating system and service match. |
Do not use a backup to push Ubuntu service files onto a RHEL server, or cPanel account backups onto a non-cPanel host.
Tips
- Create a fresh backup before major work.
- Check Status before restoring.
- Check Cron & Jobs after starting the restore.
- Keep storage connected and healthy so recovery points can be created automatically.
- Use Pro for production recovery, cross-member restores, and faster rollback.
Recipes Tab
Use the Recipes tab to run guided setup, hardening, verification, TLS, and maintenance actions on one server. Recipes are designed for repeatable server tasks where the platform can do the routine work and then show whether the result is active, inactive, running, or needs review.
Recipes apply to the selected member only. Pool-wide features such as Protection, Managed DNS, and Storage Pools are managed from their own pool tabs.
What recipes are
Recipes are guided actions for common server tasks:
The Recipes tab shows only recipes that make sense for the selected server. A cPanel server will show cPanel recipes. A database server will show database recipes. An OpenLiteSpeed server will show OpenLiteSpeed recipes.
Free and Pro
Community is useful for visibility. Pro turns Recipes into a guided operations toolkit for production hosts.
Recipe card states
If a card says the agent must be updated first, run Update balctl agent, wait for the member to check in again, then return to the recipe.
Running a recipe
Some recipes can be disabled again from the card menu. Disable actions can affect access or service behavior, so read the confirmation before continuing.
Common recipes
Install recipes for cPanel, OpenLiteSpeed, and MariaDB/MySQL may be launched from the relevant product area instead of appearing as general recipe cards. After installation is detected, the matching member tab becomes available or active.
TLS recipes
TLS recipes need a compatible DNS setup because certificate validation may require DNS changes.
Before running TLS recipes:
Use the Control panel or service-specific tab after the certificate is issued if the web server still needs configuration.
Hardening recipes
Hardening recipes usually adjust or verify firewall/service access for the selected stack.
Before running a hardening recipe:
Hardening helps with standard access rules, but it does not replace a full security review.
WHM and cPanel recipes
cPanel recipes appear when cPanel is detected.
Use them to:
Account management still belongs in the cPanel tab. Scheduled standby replication still belongs in the pool Protection tab.
Monitoring Tab
Use the member Monitoring tab to choose alert thresholds for one server. This is different from pool Monitoring, which handles fleet-level and protection/failover alerts.
Member Monitoring answers: when should this specific server email me because heartbeat, CPU, memory, disk, cPanel service, or cPanel account quota needs attention?
What you configure
| Area | What it is for |
|---|---|
| Heartbeat | Email when the agent stops checking in. |
| CPU | Email on sustained high CPU usage. |
| Memory | Email on sustained memory pressure. |
| Disk space | Email when the root filesystem reaches a selected usage level. |
| cPanel service alerts | Email when selected core cPanel services are down. |
| Hosting account disk quota | Email when WHM accounts on the member reach a disk threshold. |
| Recovery notifications | Email when the member recovers after an alert state. |
Alert recipients are managed in member Settings. Monitoring controls what triggers an alert; Settings controls who receives it.
Free and Pro
| Feature | Community | Pro |
|---|---|---|
| View live monitoring state | Included | Included |
| Heartbeat alert at community timing | Included | Included |
| Faster heartbeat alert presets | Upgrade required | Included |
| CPU, memory, and disk threshold alerts | Upgrade required | Included |
| cPanel service-down alerts | Upgrade required | Included |
| cPanel hosting account quota alerts | Upgrade required | Included |
| Recovery notification emails | Upgrade required | Included |
Community gives basic heartbeat awareness. Pro gives proper server operations alerts, with faster timing and resource/service thresholds.
Alerts
Infrastructure alerts
The first section covers the server itself.
| Alert | Useful when |
|---|---|
| Heartbeat | You want to know the agent stopped checking in. |
| CPU | You want alerts for sustained compute pressure. |
| Memory | You want alerts before memory pressure affects services. |
| Disk space | You want warnings before the root filesystem fills. |
CPU and memory alerts need telemetry from the agent and are based on sustained usage, not one short spike.
cPanel alerts
When cPanel is detected, Monitoring also shows cPanel-specific alert presets.
Use cPanel service alerts for services such as web, mail, database, and other core WHM services reported by the member. Use hosting account disk quota alerts to watch WHM account disk usage across accounts on that server.
These alerts are Pro features because they are production hosting controls, not just basic host reachability.
Saving monitoring settings
- Open the pool.
- Select the member.
- Open Monitoring.
- Choose the alert presets you want.
- Click Save monitoring settings.
If a preset is disabled, it usually requires Pro or an active trial, or the matching service has not been detected on that member.
Settings Tab
Use member Settings to manage identity, allowed source IPs, alert recipients, agent update behavior, WHM access, and member removal for one enrolled server.
This tab is for the selected member only. Pool name, pool deletion, Managed DNS, Storage Pools, and Protection settings live in their own pool-level areas.
What you can manage
| Section | What it is for |
|---|---|
| Member details | Friendly name, agent hostname, and allowed source IPs. |
| Alert recipients | Account email toggle and additional team email addresses for monitoring alerts. |
| Agent updates | Installed agent version, update channel, and auto-update setting. |
| WHM API key | cPanel account discovery and recovery access for this member. |
| Danger zone | Remove the member from the pool. |
Free and Pro
| Feature | Community | Pro |
|---|---|---|
| View member details | Included | Included |
| View alert recipient settings | Included | Included |
| Send alerts to account email where available | Included | Included |
| Edit member name, hostname, and allowed IPs | Upgrade required | Included |
| Add extra team alert recipients | Upgrade required | Included |
| Change agent update channel and auto-update | Upgrade required | Included |
| Add, edit, rotate, or remove WHM API key | Upgrade required | Included |
| Remove member from pool | Upgrade required | Included |
Community keeps settings visible. Pro gives the operational controls needed for teams and production hosting.
Member details
Member details control how the server is identified and allowed to connect.
| Field | Meaning |
|---|---|
| Friendly name | Display name shown in the pool UI. |
| Agent hostname | Hostname the member should report as. |
| Allowed source IPs | Public egress IP addresses allowed to contact ServersCTL for this member. |
Be careful when editing allowed IPs. If the member's real egress IP is removed, the agent may stop checking in until the allowed list is corrected.
Alert recipients
Settings controls who receives monitoring emails.
You can:
- Send alerts to the account email.
- Add extra team email addresses on Pro.
- Remove extra recipients.
- Save recipient changes.
The alert rules themselves are configured in the member Monitoring tab.
Agent updates
The Agent updates card shows the installed agent build and lets Pro users choose:
| Setting | Meaning |
|---|---|
| Production | Normal release channel for most users. |
| Stable | Conservative channel when available. |
| Development | Early channel for testing newer builds. |
| Auto-update | Lets the member update itself according to the selected channel. |
Use Production for normal production servers unless support asks you to use another channel.
WHM API key
When cPanel is detected, Settings shows a WHM API key card.
The member WHM key is used for cPanel account discovery and local WHM operations for that server, such as account management and recovery checks. It is not the same as a DNS provider key.
Available Pro actions:
| Action | What it does |
|---|---|
| Add WHM API key | Links this cPanel member to WHM access. |
| Rotate key | Replaces the saved key. |
| Edit | Updates WHM connection details. |
| Remove | Removes the saved WHM access for this member. |
DNS cutover keys belong in Managed DNS, not in member Settings.
Remove member
The Danger zone lets Pro users remove the member from the pool.
Removing a member detaches it from the pool so it can be enrolled again with a fresh key. Do this only when you are sure the server should no longer be managed from this pool.
Before removing a member:
- Check whether it is used by Protection, Agent Transfer, or recovery workflows.
- Confirm you no longer need its backups or history from the pool view.
- Make sure you know how to reinstall or re-enroll the agent if needed.